- A+
一 JSR107
1. JSR107介绍
Java Caching定义了5个核心接口,分别是CachingProvider, CacheManager, Cache, Entry和 Expiry。
(1)CachingProvider定义了创建、配置、获取、管理和控制多个CacheManager。一个应用可以在运行期访问多个CachingProvider。
(2)CacheManager定义了创建、配置、获取、管理和控制多个唯一命名的Cache,这些Cache存在于CacheManager的上下文中。一个CacheManager仅被一个CachingProvider所拥有。
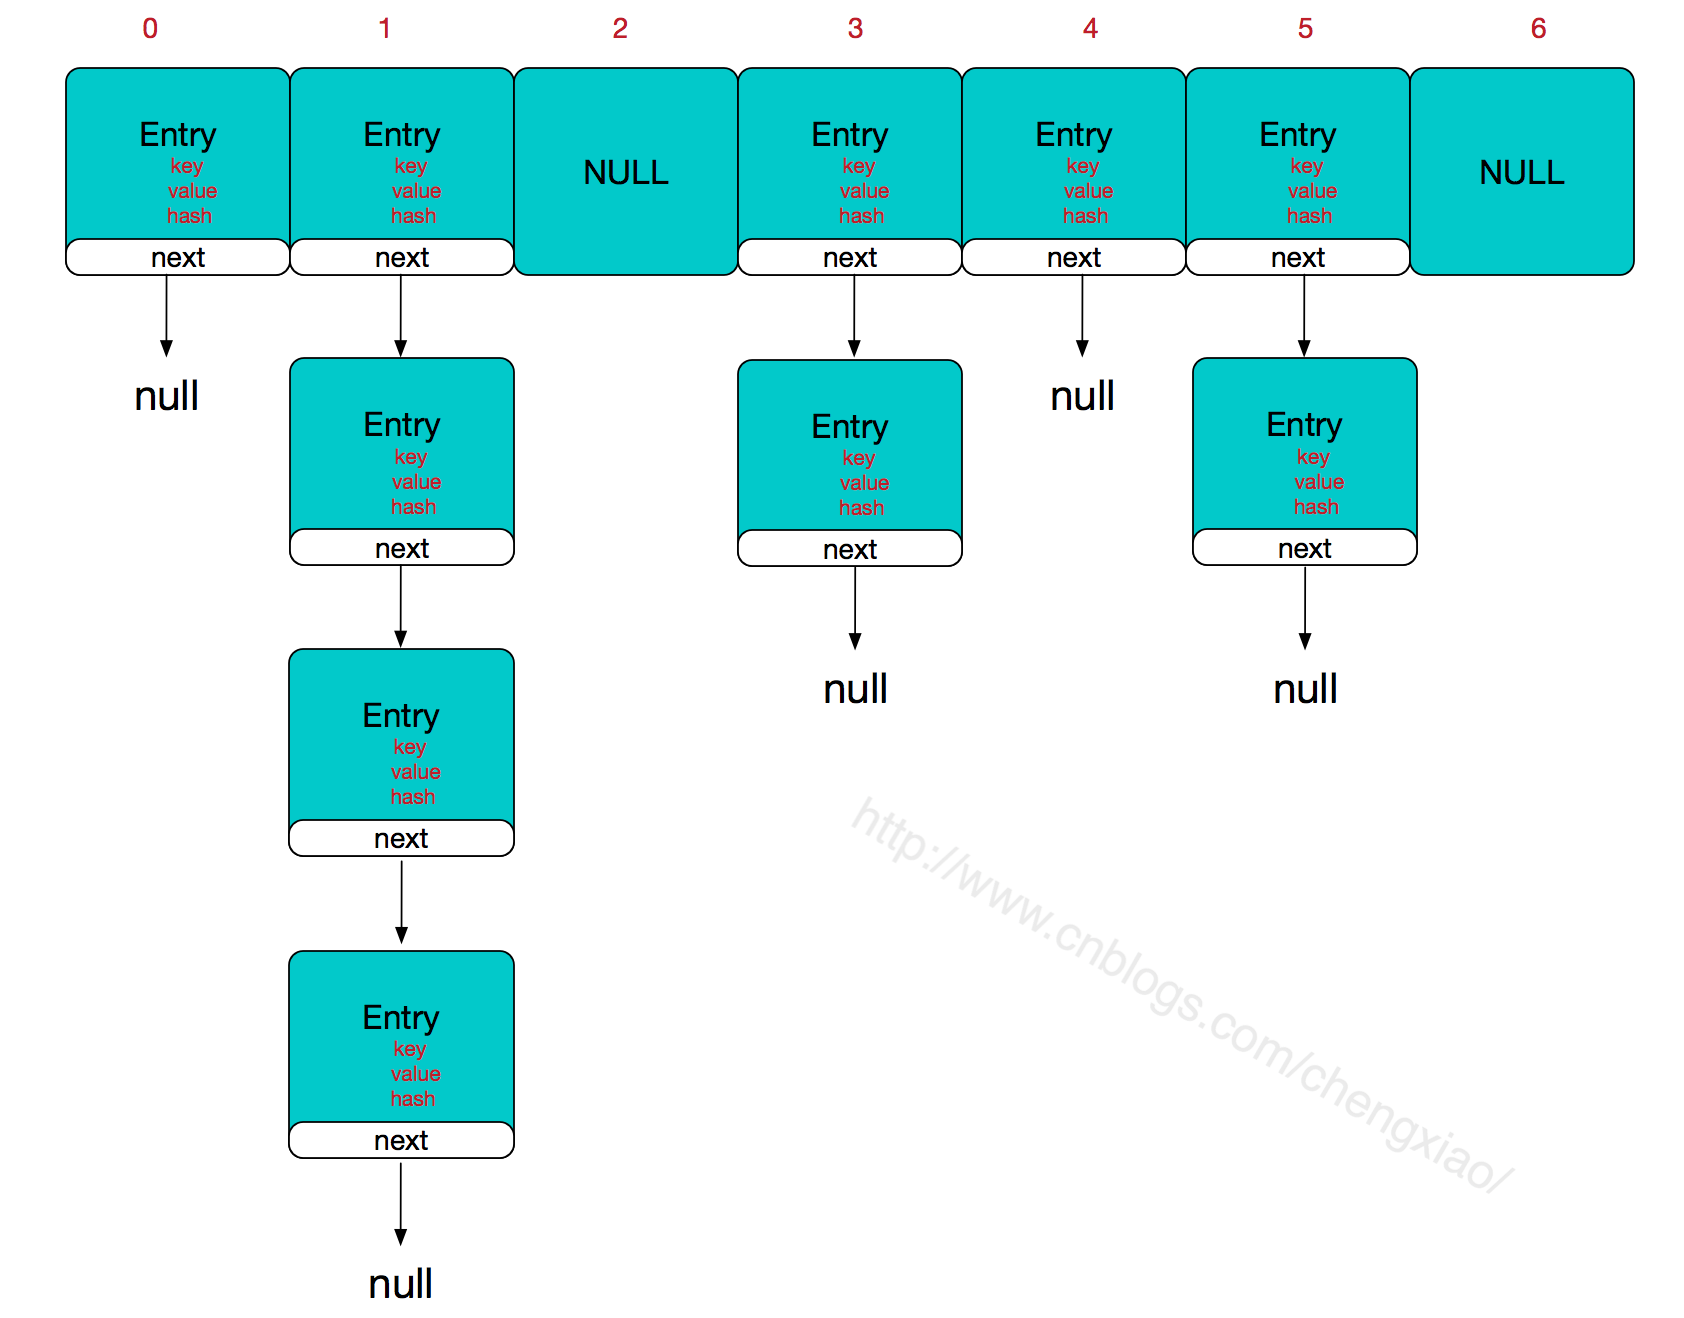
(3)Cache是一个类似Map的数据结构并临时存储以Key为索引的值。一个Cache仅被一个CacheManager所拥有。
(4) Entry是一个存储在Cache中的key-value对。
(5)Expiry 每一个存储在Cache中的条目有一个定义的有效期。一旦超过这个时间,条目为过期的状态。一旦过期,条目将不可访问、更新和删除。缓存有效期可以通过ExpiryPolicy设置。
2. 结构图如下:
二 Spring缓存抽象
1. 缓存技术
Spring从3.1开始定义了org.springframework.cache.Cache
和org.springframework.cache.CacheManager接口来统一不同的缓存技术;
并支持使用JCache(JSR-107)注解简化我们开发;
(1)Cache接口为缓存的组件规范定义,包含缓存的各种操作集合;
(2)Cache接口下Spring提供了各种xxxCache的实现;如RedisCache,EhCacheCache , ConcurrentMapCache等;
(3)每次调用需要缓存功能的方法时,Spring会检查指定参数的指定的目标方法是否已经被调用过;如果有就直接从缓存中获取方法调用后的结果,如果没有就调用方法并缓存结果后返回给用户。下次调用直接从缓存中获取。
(4)使用Spring缓存抽象时我们需要关注以下两点;
① 确定方法需要被缓存以及他们的缓存策略
② 从缓存中读取之前缓存存储的数据
2. 结构图
三 缓存注解
1. 缓存注解说明
2. 缓存注解主要参数
3. 注解参数支持SpEL表达式
四 使用缓存
1. 使用步骤
(1)引入spring-boot-starter-cache模块
(2)在启动类上使用@EnableCaching开启缓存
(3)在业务层方法上使用注解缓存
(4)切换为其他缓存
1
2
3
4
2. 缓存案例
(1)引入spring-boot-starter-cache
<dependency>
<groupId>org.springframework.boot</groupId>
<artifactId>spring-boot-starter-cache</artifactId>
</dependency>
1
2
3
4
(2)自定义keyGenerator
@Configuration
public class MyCacheConfig {
@Bean("myKeyGenerator")
public KeyGenerator keyGenerator(){
return new KeyGenerator(){
@Override
public Object generate(Object target, Method method, Object... params) {
return method.getName()+"["+ Arrays.asList(params).toString()+"]";
}
};
}
}
1
2
3
4
5
6
7
8
9
10
11
12
13
14
(3)缓存注解的使用
@CacheConfig(cacheNames="emp"/*,cacheManager = "employeeCacheManager"*/) //抽取缓存的公共配置
@Service
public class EmployeeService {
@Autowired
EmployeeMapper employeeMapper;
/**
* 将方法的运行结果进行缓存;以后再要相同的数据,直接从缓存中获取,不用调用方法;
* CacheManager管理多个Cache组件的,对缓存的真正CRUD操作在Cache组件中,每一个缓存组件有自己唯一一个名字;
*
*
* 原理:
* 1、自动配置类;CacheAutoConfiguration
* 2、缓存的配置类
* org.springframework.boot.autoconfigure.cache.GenericCacheConfiguration
* org.springframework.boot.autoconfigure.cache.JCacheCacheConfiguration
* org.springframework.boot.autoconfigure.cache.EhCacheCacheConfiguration
* org.springframework.boot.autoconfigure.cache.HazelcastCacheConfiguration
* org.springframework.boot.autoconfigure.cache.InfinispanCacheConfiguration
* org.springframework.boot.autoconfigure.cache.CouchbaseCacheConfiguration
* org.springframework.boot.autoconfigure.cache.RedisCacheConfiguration
* org.springframework.boot.autoconfigure.cache.CaffeineCacheConfiguration
* org.springframework.boot.autoconfigure.cache.GuavaCacheConfiguration
* org.springframework.boot.autoconfigure.cache.SimpleCacheConfiguration【默认】
* org.springframework.boot.autoconfigure.cache.NoOpCacheConfiguration
* 3、哪个配置类默认生效:SimpleCacheConfiguration;
*
* 4、给容器中注册了一个CacheManager:ConcurrentMapCacheManager
* 5、可以获取和创建ConcurrentMapCache类型的缓存组件;他的作用将数据保存在ConcurrentMap中;
*
* 运行流程:
* @Cacheable:
* 1、方法运行之前,先去查询Cache(缓存组件),按照cacheNames指定的名字获取;
* (CacheManager先获取相应的缓存),第一次获取缓存如果没有Cache组件会自动创建。
* 2、去Cache中查找缓存的内容,使用一个key,默认就是方法的参数;
* key是按照某种策略生成的;默认是使用keyGenerator生成的,默认使用SimpleKeyGenerator生成key;
* SimpleKeyGenerator生成key的默认策略;
* 如果没有参数;key=new SimpleKey();
* 如果有一个参数:key=参数的值
* 如果有多个参数:key=new SimpleKey(params);
* 3、没有查到缓存就调用目标方法;
* 4、将目标方法返回的结果,放进缓存中
*
* @Cacheable标注的方法执行之前先来检查缓存中有没有这个数据,默认按照参数的值作为key去查询缓存,
* 如果没有就运行方法并将结果放入缓存;以后再来调用就可以直接使用缓存中的数据;
*
* 核心:
* 1)、使用CacheManager【ConcurrentMapCacheManager】按照名字得到Cache【ConcurrentMapCache】组件
* 2)、key使用keyGenerator生成的,默认是SimpleKeyGenerator
*
*
* 几个属性:
* cacheNames/value:指定缓存组件的名字;将方法的返回结果放在哪个缓存中,是数组的方式,可以指定多个缓存;
*
* key:缓存数据使用的key;可以用它来指定。默认是使用方法参数的值 1-方法的返回值
* 编写SpEL; #id;参数id的值 #a0 #p0 #root.args[0]
* getEmp[2]
*
* keyGenerator:key的生成器;可以自己指定key的生成器的组件id
* key/keyGenerator:二选一使用;
*
*
* cacheManager:指定缓存管理器;或者cacheResolver指定获取解析器
*
* condition:指定符合条件的情况下才缓存;
* ,condition = "#id>0"
* condition = "#a0>1":第一个参数的值>1的时候才进行缓存
*
* unless:否定缓存;当unless指定的条件为true,方法的返回值就不会被缓存;可以获取到结果进行判断
* unless = "#result == null"
* unless = "#a0==2":如果第一个参数的值是2,结果不缓存;
* sync:是否使用异步模式
* @param id
* @return
*
*/
@Cacheable(value = {"emp"}/*,keyGenerator = "myKeyGenerator",condition = "#a0>1",unless = "#a0==2"*/)
public Employee getEmp(Integer id){
System.out.println("查询"+id+"号员工");
Employee emp = employeeMapper.getEmpById(id);
return emp;
}
/**
* @CachePut:既调用方法,又更新缓存数据;同步更新缓存
* 修改了数据库的某个数据,同时更新缓存;
* 运行时机:
* 1、先调用目标方法
* 2、将目标方法的结果缓存起来
*
* 测试步骤:
* 1、查询1号员工;查到的结果会放在缓存中;
* key:1 value:lastName:张三
* 2、以后查询还是之前的结果
* 3、更新1号员工;【lastName:zhangsan;gender:0】
* 将方法的返回值也放进缓存了;
* key:传入的employee对象 值:返回的employee对象;
* 4、查询1号员工?
* 应该是更新后的员工;
* key = "#employee.id":使用传入的参数的员工id;
* key = "#result.id":使用返回后的id
* @Cacheable的key是不能用#result
* 为什么是没更新前的?【1号员工没有在缓存中更新】
*
*/
@CachePut(/*value = "emp",*/key = "#result.id")
public Employee updateEmp(Employee employee){
System.out.println("updateEmp:"+employee);
employeeMapper.updateEmp(employee);
return employee;
}
/**
* @CacheEvict:缓存清除
* key:指定要清除的数据
* allEntries = true:指定清除这个缓存中所有的数据
* beforeInvocation = false:缓存的清除是否在方法之前执行
* 默认代表缓存清除操作是在方法执行之后执行;如果出现异常缓存就不会清除
*
* beforeInvocation = true:
* 代表清除缓存操作是在方法运行之前执行,无论方法是否出现异常,缓存都清除
*
*
*/
@CacheEvict(value="emp",beforeInvocation = true/*key = "#id",*/)
public void deleteEmp(Integer id){
System.out.println("deleteEmp:"+id);
//employeeMapper.deleteEmpById(id);
int i = 10/0;
}
// @Caching 定义复杂的缓存规则
@Caching(
cacheable = {
@Cacheable(/*value="emp",*/key = "#lastName")
},
put = {
@CachePut(/*value="emp",*/key = "#result.id"),
@CachePut(/*value="emp",*/key = "#result.email")
}
)
public Employee getEmpByLastName(String lastName){
return employeeMapper.getEmpByLastName(lastName);
}
}
1
2
3
4
5
6
7
8
9
10
11
12
13
14
15
16
17
18
19
20
21
22
23
24
25
26
27
28
29
30
31
32
33
34
35
36
37
38
39
40
41
42
43
44
45
46
47
48
49
50
51
52
53
54
55
56
57
58
59
60
61
62
63
64
65
66
67
68
69
70
71
72
73
74
75
76
77
78
79
80
81
82
83
84
85
86
87
88
89
90
91
92
93
94
95
96
97
98
99
100
101
102
103
104
105
106
107
108
109
110
111
112
113
114
115
116
117
118
119
120
121
122
123
124
125
126
127
128
129
130
131
132
133
134
135
136
137
138
139
140
141
142
143
144
145
146
147
148
149
五 缓存流程
1、自动配置类和缓存配置类
(1)CacheAutoConfiguration
(2)org.springframework.boot.autoconfigure.cache.GenericCacheConfiguration
(3)org.springframework.boot.autoconfigure.cache.JCacheCacheConfiguration
(4)org.springframework.boot.autoconfigure.cache.EhCacheCacheConfiguration
(5)org.springframework.boot.autoconfigure.cache.HazelcastCacheConfiguration
(6)org.springframework.boot.autoconfigure.cache.InfinispanCacheConfiguration
(7)org.springframework.boot.autoconfigure.cache.CouchbaseCacheConfiguration
(8)org.springframework.boot.autoconfigure.cache.RedisCacheConfiguration
(9)org.springframework.boot.autoconfigure.cache.CaffeineCacheConfiguration
(10)org.springframework.boot.autoconfigure.cache.GuavaCacheConfiguration
(11)org.springframework.boot.autoconfigure.cache.SimpleCacheConfiguration【默认】
(12)org.springframework.boot.autoconfigure.cache.NoOpCacheConfiguration
1
2
3
4
5
6
7
8
9
10
11
12
2、哪个配置类默认生效:SimpleCacheConfiguration;
3、给容器中注册了一个CacheManager:ConcurrentMapCacheManager
4、可以获取和创建ConcurrentMapCache类型的缓存组件;他的作用将数据保存在ConcurrentMap中;
2、运行流程:
@Cacheable:
(1)方法运行之前,先去查询Cache(缓存组件),按照cacheNames指定的名字获取;(CacheManager先获取相应的缓存),第一次获取缓存如果没有Cache组件会自动创建。
(2)去Cache中查找缓存的内容,使用一个key,默认就是方法的参数; key是按照某种策略生成的;默认是使用keyGenerator生成的,默认使用SimpleKeyGenerator生成key;
SimpleKeyGenerator生成key的默认策略;
如果没有参数;key=new SimpleKey();
如果有一个参数:key=参数的值
如果有多个参数:key=new SimpleKey(params);
(3)没有查到缓存就调用目标方法;
(4)将目标方法返回的结果,放进缓存中
总结:
@Cacheable标注的方法执行之前先来检查缓存中有没有这个数据,默认按照参数的值作为key去查询缓存,
如果没有就运行方法并将结果放入缓存;以后再来调用就可以直接使用缓存中的数据;
核心:
① 使用CacheManager【ConcurrentMapCacheManager】按照名字得到Cache【ConcurrentMapCache】组件
② key使用keyGenerator生成的,默认是SimpleKeyGenerator
六 整合Redis实现缓存
1、整合步骤
(1)引入spring-boot-starter-data-redis
(2)application.yml配置redis连接地址
(3)使用RestTemplate操作redis
① redisTemplate.opsForValue();//操作字符串
② redisTemplate.opsForHash();//操作hash
③ redisTemplate.opsForList();//操作list
④ redisTemplate.opsForSet();//操作set
⑤ redisTemplate.opsForZSet();//操作有序set
(4)配置缓存、CacheManagerCustomizers
(5)测试使用缓存、切换缓存、 CompositeCacheManager
2、案例实现
(1)导入依赖
<dependency>
<groupId>org.springframework.boot</groupId>
<artifactId>spring-boot-starter-data-redis</artifactId>
</dependency>
1
2
3
4
(2)主配置类
/**
* 一、搭建基本环境
* 1、导入数据库文件 创建出department和employee表
* 2、创建javaBean封装数据
* 3、整合MyBatis操作数据库
* 1.配置数据源信息
* 2.使用注解版的MyBatis;
* 1)、@MapperScan指定需要扫描的mapper接口所在的包
* 二、快速体验缓存
* 步骤:
* 1、开启基于注解的缓存 @EnableCaching
* 2、标注缓存注解即可
* @Cacheable
* @CacheEvict
* @CachePut
* 默认使用的是ConcurrentMapCacheManager==ConcurrentMapCache;将数据保存在 ConcurrentMap<Object, Object>中
* 开发中使用缓存中间件;redis、memcached、ehcache;
* 三、整合redis作为缓存
* Redis 是一个开源(BSD许可)的,内存中的数据结构存储系统,它可以用作数据库、缓存和消息中间件。
* 1、安装redis:使用docker;
* 2、引入redis的starter
* 3、配置redis
* 4、测试缓存
* 原理:CacheManager===Cache 缓存组件来实际给缓存中存取数据
* 1)、引入redis的starter,容器中保存的是 RedisCacheManager;
* 2)、RedisCacheManager 帮我们创建 RedisCache 来作为缓存组件;RedisCache通过操作redis缓存数据的
* 3)、默认保存数据 k-v 都是Object;利用序列化保存;如何保存为json
* 1、引入了redis的starter,cacheManager变为 RedisCacheManager;
* 2、默认创建的 RedisCacheManager 操作redis的时候使用的是 RedisTemplate<Object, Object>
* 3、RedisTemplate<Object, Object> 是 默认使用jdk的序列化机制
* 4)、自定义CacheManager;
*
*/
@MapperScan("com.atguigu.cache.mapper")
@SpringBootApplication
@EnableCaching
public class Springboot01CacheApplication {
public static void main(String[] args) {
SpringApplication.run(Springboot01CacheApplication.class, args);
}
}
1
2
3
4
5
6
7
8
9
10
11
12
13
14
15
16
17
18
19
20
21
22
23
24
25
26
27
28
29
30
31
32
33
34
35
36
37
38
39
40
41
42
43
(3)在配置类中自定义对象装换为json的序列化;自定义cacheManager
@Configuration
public class MyRedisConfig {
@Bean
public RedisTemplate<Object, Employee> empRedisTemplate(
RedisConnectionFactory redisConnectionFactory)
throws UnknownHostException {
RedisTemplate<Object, Employee> template = new RedisTemplate<Object, Employee>();
template.setConnectionFactory(redisConnectionFactory);
Jackson2JsonRedisSerializer<Employee> ser = new Jackson2JsonRedisSerializer<Employee>(Employee.class);
template.setDefaultSerializer(ser);
return template;
}
@Bean
public RedisTemplate<Object, Department> deptRedisTemplate(
RedisConnectionFactory redisConnectionFactory)
throws UnknownHostException {
RedisTemplate<Object, Department> template = new RedisTemplate<Object, Department>();
template.setConnectionFactory(redisConnectionFactory);
Jackson2JsonRedisSerializer<Department> ser = new Jackson2JsonRedisSerializer<Department>(Department.class);
template.setDefaultSerializer(ser);
return template;
}
//CacheManagerCustomizers可以来定制缓存的一些规则
@Primary //将某个缓存管理器作为默认的
@Bean
public RedisCacheManager employeeCacheManager(RedisTemplate<Object, Employee> empRedisTemplate){
RedisCacheManager cacheManager = new RedisCacheManager(empRedisTemplate);
//key多了一个前缀
//使用前缀,默认会将CacheName作为key的前缀
cacheManager.setUsePrefix(true);
return cacheManager;
}
@Bean
public RedisCacheManager deptCacheManager(RedisTemplate<Object, Department> deptRedisTemplate){
RedisCacheManager cacheManager = new RedisCacheManager(deptRedisTemplate);
//key多了一个前缀
//使用前缀,默认会将CacheName作为key的前缀
cacheManager.setUsePrefix(true);
return cacheManager;
}
1
2
3
4
5
6
7
8
9
10
11
12
13
14
15
16
17
18
19
20
21
22
23
24
25
26
27
28
29
30
31
32
33
34
35
36
37
38
39
40
41
42
43
44
45
46
47
48
49
(3)业务层
@Service
public class DeptService {
@Autowired
DepartmentMapper departmentMapper;
@Qualifier("deptCacheManager")
@Autowired
RedisCacheManager deptCacheManager;
/**
* 缓存的数据能存入redis;
* 第二次从缓存中查询就不能反序列化回来;
* 存的是dept的json数据;CacheManager默认使用RedisTemplate<Object, Employee>操作Redis
*
*1:使用缓存注解
* @param id
* @return
*/
// @Cacheable(cacheNames = "dept",cacheManager = "deptCacheManager")
// public Department getDeptById(Integer id){
// System.out.println("查询部门"+id);
// Department department = departmentMapper.getDeptById(id);
// return department;
// }
//2:使用缓存管理器得到缓存,进行api调用
public Department getDeptById(Integer id){
System.out.println("查询部门"+id);
Department department = departmentMapper.getDeptById(id);
//获取某个缓存
Cache dept = deptCacheManager.getCache("dept");
dept.put("dept:1",department);
return department;
}
}
1
2
3
4
5
6
7
8
9
10
11
12
13
14
15
16
17
18
19
20
21
22
23
24
25
26
27
28
29
30
31
32
33
34
35
36
37
38
39
40
(4)测试类
@RunWith(SpringRunner.class)
@SpringBootTest
public class Springboot01CacheApplicationTests {
@Autowired
EmployeeMapper employeeMapper;
@Autowired
StringRedisTemplate stringRedisTemplate; //操作k-v都是字符串的
@Autowired
RedisTemplate redisTemplate; //k-v都是对象的
@Autowired
RedisTemplate<Object, Employee> empRedisTemplate;
/**
* Redis常见的五大数据类型
* String(字符串)、List(列表)、Set(集合)、Hash(散列)、ZSet(有序集合)
* stringRedisTemplate.opsForValue()[String(字符串)]
* stringRedisTemplate.opsForList()[List(列表)]
* stringRedisTemplate.opsForSet()[Set(集合)]
* stringRedisTemplate.opsForHash()[Hash(散列)]
* stringRedisTemplate.opsForZSet()[ZSet(有序集合)]
*/
@Test
public void test01(){
//给redis中保存数据
//stringRedisTemplate.opsForValue().append("msg","hello");
// String msg = stringRedisTemplate.opsForValue().get("msg");
// System.out.println(msg);
// stringRedisTemplate.opsForList().leftPush("mylist","1");
// stringRedisTemplate.opsForList().leftPush("mylist","2");
}
//测试保存对象
@Test
public void test02(){
Employee empById = employeeMapper.getEmpById(1);
//默认如果保存对象,使用jdk序列化机制,序列化后的数据保存到redis中
//redisTemplate.opsForValue().set("emp-01",empById);
//1、将数据以json的方式保存
//(1)自己将对象转为json
//(2)redisTemplate默认的序列化规则;改变默认的序列化规则;
empRedisTemplate.opsForValue().set("emp-01",empById);
}
}
————————————————
版权声明:本文为CSDN博主「勉之~」的原创文章,遵循CC 4.0 BY-SA版权协议,转载请附上原文出处链接及本声明。
原文链接:https://blog.csdn.net/hcyxsh/article/details/115311509