- A+
一、JSR-107规范
Java Caching定义了5个核心接口,分别是CachingProvider(缓存提供者)、CacheManager(缓存管理器)、Cache(缓存)、Entry(缓存键值对)和Expiry(缓存时效)。
CachingProvider定义了创建、配置、获取、管理和控制多个CacheManager。一个应用可以在运行期访问多个CachingProvider。
CacheManager定义了创建、配置、获取、管理和控制多个唯一命名的Cache,这些Cache存在于CacheManager的上下文中。一个CacheManager仅被一个CachingProvider所拥有。
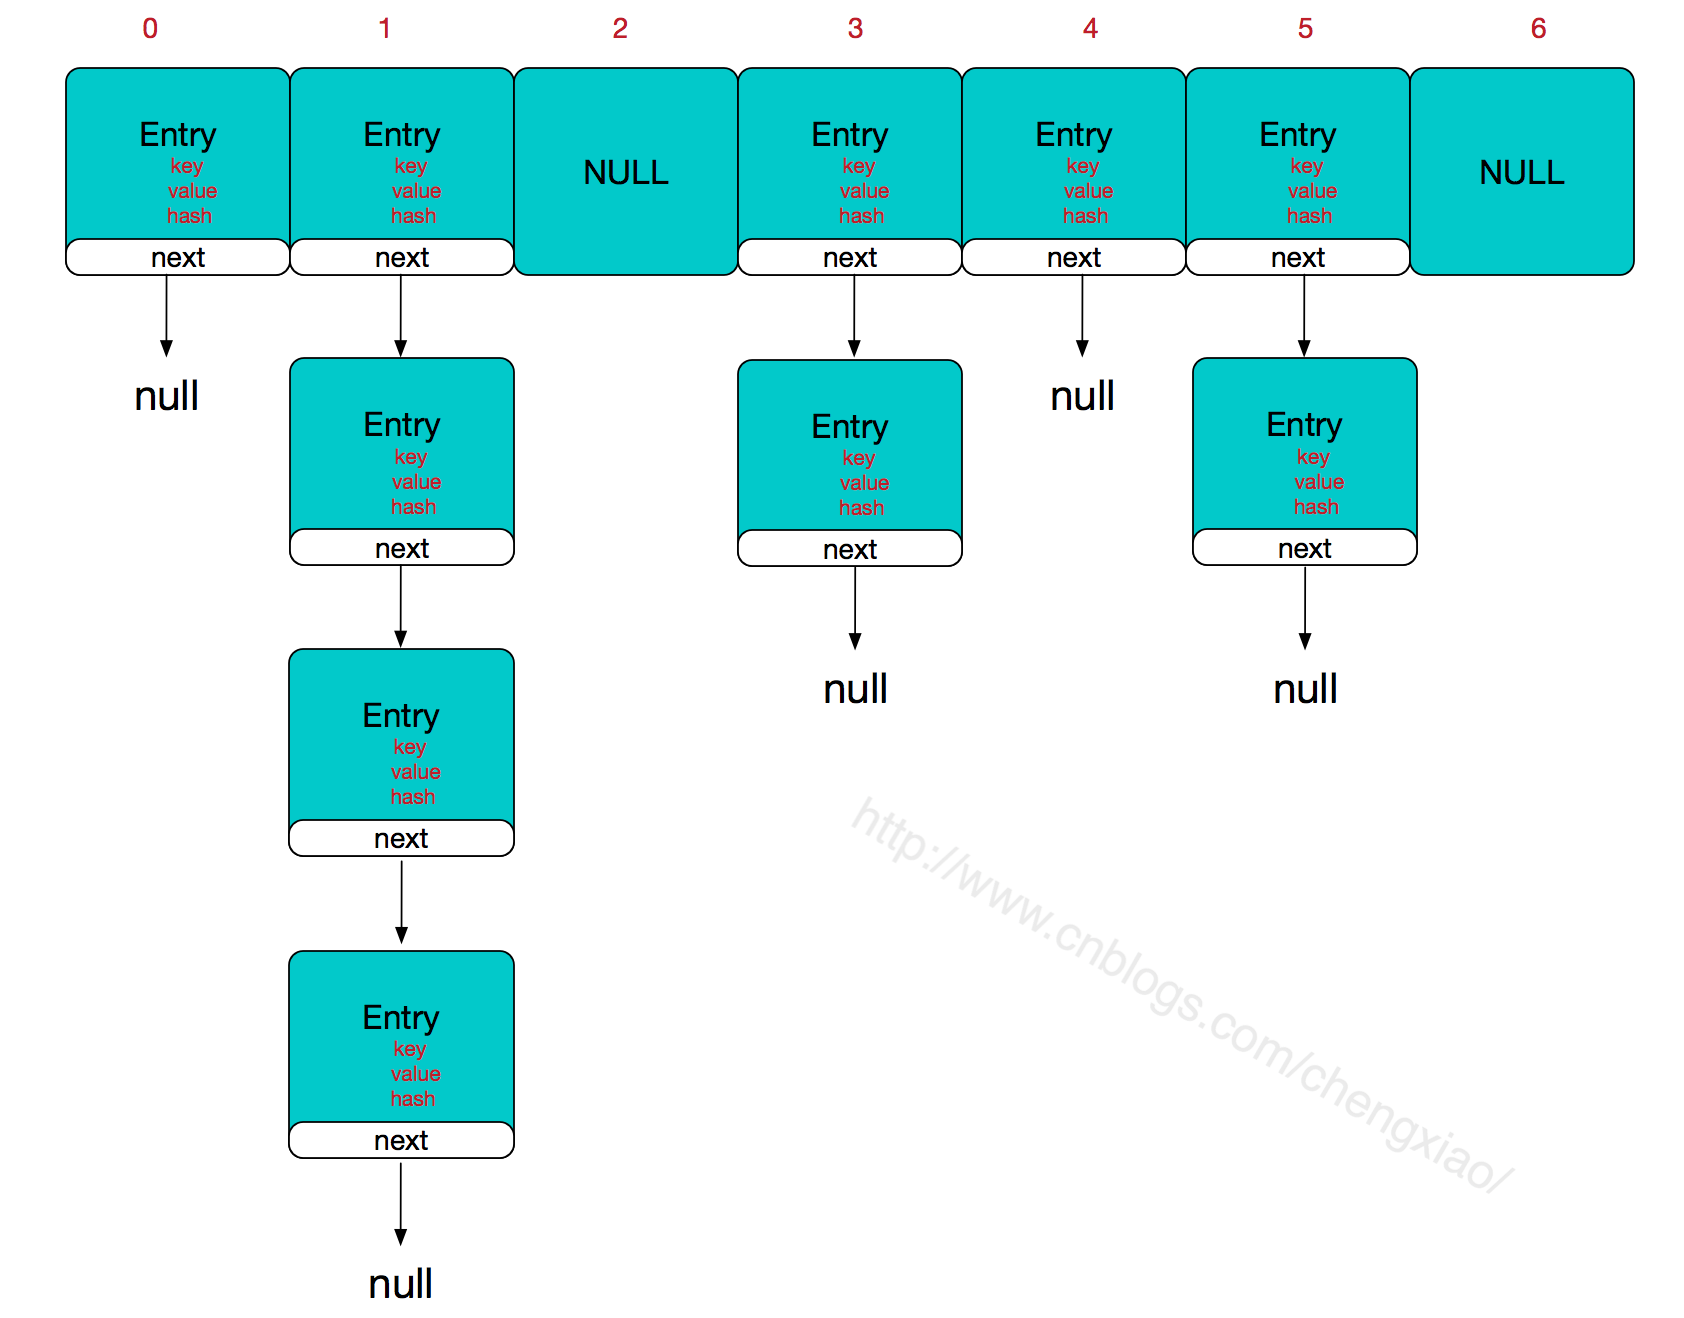
Cache是一个类似Map的数据结构并临时存储以Key为索引的值。一个Cache仅被一个CacheManager所拥有。
Entry是一个存储在Cache中的key-value对。
Expiry 每一个存储在Cache中的条目有一个定义的有效期。一旦超过这个时间,条目为过期的状态。一旦过期,条目将不可访问、更新和删除。缓存有效期可以通过ExpiryPolicy设置。
一个应用里面可以有多个缓存提供者(CachingProvider),一个缓存提供者可以获取到多个缓存管理器(CacheManager),一个缓存管理器管理着不同的缓存(Cache),缓存中是一个个的缓存键值对(Entry),每个entry都有一个有效期(Expiry)。缓存管理器和缓存之间的关系有点类似于数据库中连接池和连接的关系。
开发中使用JSR-107需要导入包:一般不直接使用JSR-107开发,因为JSR-107仅仅定义了接口,而没有实现
<!-- https://mvnrepository.com/artifact/javax.cache/cache-api -->
<dependency>
<groupId>javax.cache</groupId>
<artifactId>cache-api</artifactId>
<version>1.1.0</version>
</dependency>
1
2
3
4
5
6
二、Spring缓存抽象
1、简介
Spring从3.1开始定义了org.springframework.cache.Cache和
org.springframework.cache.CacheManager接口来统一不同的缓存技术;并支持使用JCache(JSR-107)注解简化我们开发。
Cache接口为缓存的组件规范定义,包含缓存的各种操作(增删改查)集合。Cache接口下Spring提供了各种XxxCache的实现,如RedisCache、EhCacheCache、ConcurrentMapCache等。每次调用需要缓存功能的方法时,Spring会检查指定参数的指定的目标方法是否已经被调用过,如果有就直接从缓存中获取方法调用后的结果,如果没有就调用方法并缓存结果后返回给用户。下次调用直接从缓存中获取。
使用Spring缓存抽象时我们需要关注以下两点:
①确定方法需要被缓存以及他们的缓存策略
②从缓存中读取之前缓存存储的数据
几个重要概念&缓存注解:
概念/注解 作用
Cache 缓存接口,定义缓存操作。实现有:RedisCache、EhCacheCache、ConcurrentMapCache等
CacheManager 缓存管理器,管理各种缓存(Cache)组件
@Cacheable 主要针对方法配置,能够根据方法的请求参数对其结果进行缓存
@CacheEvict 清空缓存
@CachePut 保证方法被调用,又希望结果被缓存。
@EnableCaching 开启基于注解的缓存
keyGenerator 缓存数据时key生成策略
serialize 缓存数据时value序列化策略
说明:
①@Cacheable标注在方法上,表示该方法的结果需要被缓存起来,缓存的键由keyGenerator的策略决定,缓存的值的形式则由serialize序列化策略决定(序列化还是json格式);标注上该注解之后,在缓存时效内再次调用该方法时将不会调用方法本身而是直接从缓存获取结果
②@CachePut也标注在方法上,和@Cacheable相似也会将方法的返回值缓存起来,不同的是标注@CachePut的方法每次都会被调用,而且每次都会将结果缓存起来,适用于对象的更新
2、基本环境搭建
①创建SpringBoot应用:选中Cache、Mysql、Mybatis、Web模块,pom如下
<?xml version="1.0" encoding="UTF-8"?>
<project xmlns="http://maven.apache.org/POM/4.0.0" xmlns:xsi="http://www.w3.org/2001/XMLSchema-instance"
xsi:schemaLocation="http://maven.apache.org/POM/4.0.0 http://maven.apache.org/xsd/maven-4.0.0.xsd">
<modelVersion>4.0.0</modelVersion>
<parent>
<groupId>org.springframework.boot</groupId>
<artifactId>spring-boot-starter-parent</artifactId>
<version>1.5.18.RELEASE</version>
<relativePath/> <!-- lookup parent from repository -->
</parent>
<groupId>com.bdm</groupId>
<artifactId>springboot-cache</artifactId>
<version>0.0.1-SNAPSHOT</version>
<name>springboot-cache</name>
<description>Demo project for Spring Boot</description>
<properties>
<java.version>1.8</java.version>
</properties>
<dependencies>
<dependency>
<groupId>org.springframework.boot</groupId>
<artifactId>spring-boot-starter-cache</artifactId>
</dependency>
<dependency>
<groupId>org.springframework.boot</groupId>
<artifactId>spring-boot-starter-web</artifactId>
</dependency>
<dependency>
<groupId>org.mybatis.spring.boot</groupId>
<artifactId>mybatis-spring-boot-starter</artifactId>
<version>1.3.2</version>
</dependency>
<dependency>
<groupId>mysql</groupId>
<artifactId>mysql-connector-java</artifactId>
<scope>runtime</scope>
</dependency>
<dependency>
<groupId>org.springframework.boot</groupId>
<artifactId>spring-boot-starter-test</artifactId>
<scope>test</scope>
</dependency>
</dependencies>
<build>
<plugins>
<plugin>
<groupId>org.springframework.boot</groupId>
<artifactId>spring-boot-maven-plugin</artifactId>
</plugin>
</plugins>
</build>
</project>
1
2
3
4
5
6
7
8
9
10
11
12
13
14
15
16
17
18
19
20
21
22
23
24
25
26
27
28
29
30
31
32
33
34
35
36
37
38
39
40
41
42
43
44
45
46
47
48
49
50
51
52
53
54
55
56
②创建数据库表
SET FOREIGN_KEY_CHECKS=0;
DROP TABLE IF EXISTS `department`;
CREATE TABLE `department` (
`id` int(11) NOT NULL AUTO_INCREMENT,
`departmentName` varchar(255) DEFAULT NULL,
PRIMARY KEY (`id`)
) ENGINE=InnoDB DEFAULT CHARSET=utf8;
DROP TABLE IF EXISTS `employee`;
CREATE TABLE `employee` (
`id` int(11) NOT NULL AUTO_INCREMENT,
`lastName` varchar(255) DEFAULT NULL,
`email` varchar(255) DEFAULT NULL,
`gender` int(2) DEFAULT NULL,
`d_id` int(11) DEFAULT NULL,
PRIMARY KEY (`id`)
) ENGINE=InnoDB DEFAULT CHARSET=utf8;
1
2
3
4
5
6
7
8
9
10
11
12
13
14
15
16
17
18
19
③创建表对应的实体Bean
@Data
public class Employee {
private Integer id;
private String lastName;
private String email;
private Integer gender; //性别 1男 0女
private Integer dId;
}
@Data
public class Department {
private Integer id;
private String departmentName;
}
1
2
3
4
5
6
7
8
9
10
11
12
13
14
④整合mybatis操作数据库
数据源配置:驱动可以不写,SpringBoot会根据连接自动判断
spring.datasource.url=jdbc:mysql://localhost:3306/springboot_cache
spring.datasource.username=root
spring.datasource.password=120288
#spring.datasource.driver-class-name=com.mysql.jdbc.Driver
#开启驼峰命名
mybatis.configuration.map-underscore-to-camel-case=true
1
2
3
4
5
6
7
使用注解版Mybatis:使用@MapperScan指定mapper接口所在的包
@SpringBootApplication
@MapperScan(basePackages = "com.bdm.cache.mappers")
public class SpringbootCacheApplication {
public static void main(String[] args) {
SpringApplication.run(SpringbootCacheApplication.class, args);
}
}
1
2
3
4
5
6
7
8
创建对应的mapper接口:使用@Mapper注解标注,标明是一个mybatis的mapper接口
@Mapper
public interface EmployeeMapper {
@Select("SELECT * FROM employee WHERE id = #{id}")
public Employee getEmpById(Integer id);
@Insert("INSERT INTO employee(lastName,email,gender,d_id) VALUES(#{lastName},#{email},#{gender},#{dId})")
public void insertEmp(Employee employee);
@Update("UPDATE employee SET lastName = #{lastName},email = #{email},gender = #{gender},d_id = #{dId} WHERE id = #{id}")
public void updateEmp(Employee employee);
@Delete("DELETE FROM employee WHERE id = #{id}")
public void deleteEmpById(Integer id);
}
1
2
3
4
5
6
7
8
9
10
11
12
13
14
15
编写Service:
@Service
public class EmployeeService {
@Autowired
EmployeeMapper employeeMapper;
public Employee getEmpById(Integer id){
Employee emp = employeeMapper.getEmpById(id);
return emp;
}
}
1
2
3
4
5
6
7
8
9
10
11
编写Controller:
@RestController
public class EmployeeController {
@Autowired
EmployeeService employeeService;
@GetMapping("/emp/{id}")
public Employee getEmp(@PathVariable("id") Integer id){
return employeeService.getEmpById(id);
}
}
1
2
3
4
5
6
7
8
9
10
11
测试:
3、@Cacheable初体验
测试之前可以先配置一下Logger日志,让控制台将Sql打印出来:
logging.level.com.bdm.cache.mappers=debug
1
①开启基于注解的缓存功能:主启动类标注@EnableCaching
@SpringBootApplication
@MapperScan(basePackages = "com.bdm.cache.mappers")
@EnableCaching //开启基于注解的缓存
public class SpringbootCacheApplication {
public static void main(String[] args) {
SpringApplication.run(SpringbootCacheApplication.class, args);
}
}
1
2
3
4
5
6
7
8
9
②标注缓存相关注解:@Cacheable、CacheEvict、CachePut
a、@Cacheable:将方法运行的结果进行缓存,以后再获取相同的数据时,直接从缓存中获取,不再调用方法
@Cacheable(cacheNames = {"emp"})
public Employee getEmpById(Integer id){
Employee emp = employeeMapper.getEmpById(id);
return emp;
}
1
2
3
4
5
@Cacheable注解的属性:
属性名 描述
cacheNames/value 指定缓存的名字,缓存使用CacheManager管理多个缓存组件Cache,这些Cache组件就是根据这个名字进行区分的。对缓存的真正CRUD操作在Cache中定义,每个缓存组件Cache都有自己唯一的名字,通过cacheNames或者value属性指定,相当于是将缓存的键值对进行分组,缓存的名字是一个数组,也就是说可以将一个缓存键值对分到多个组里面
key 缓存数据时的key的值,默认是使用方法参数的值,可以使用SpEL表达式计算key的值
keyGenerator 缓存的生成策略,和key二选一,都是生成键的,keyGenerator可自定义
cacheManager 指定缓存管理器(如ConcurrentHashMap、Redis等)
cacheResolver 和cacheManager功能一样,和cacheManager二选一
condition 指定缓存的条件(满足什么条件时才缓存),可用SpEL表达式(如#id>0,表示当入参id大于0时才缓存)
unless 否定缓存,即满足unless指定的条件时,方法的结果不进行缓存,使用unless时可以在调用的方法获取到结果之后再进行判断(如#result==null,表示如果结果为null时不缓存)
sync 是否使用异步模式进行缓存
注:
①既满足condition又满足unless条件的也不进行缓存
②使用异步模式进行缓存时(sync=true):unless条件将不被支持
可用的SpEL表达式见下表:
名字 位置 描述 示例
methodName root object 当前被调用的方法名 #root.methodName
method root object 当前被调用的方法 #root.method.name
target root object 当前被调用的目标对象 #root.target
targetClass root object 当前被调用的目标对象类 root.targetClass
args root object 当前被调用的方法的参数列表 #root.args[0]
caches root object 当前方法调用使用的缓存列表(如@Cacheable(value={“cache1”, “cache2”})),则有两个cache #root.caches[0].name
argument name evaluation context 方法参数的名字,可以直接 #参数名,也可以使用#p0或#a0的形式,0代表参数的索引 #iban、#a0、#p0
result evaluation context 方法执行后的返回值(仅当方法执行之后的判断有效,如"unless","cache put"的表达式,"cache evict"的表达式beforeInvocation=false) #result
三、缓存工作原理
1、自动配置类:CacheAutoConfiguration,通过CacheAutoConfiguration导入的CacheConfigurationImportSelector会向数组中添加一些缓存的配置类全类名
2、缓存的配置类 org.springframework.boot.autoconfigure.cache.GenericCacheConfiguration
org.springframework.boot.autoconfigure.cache.JCacheCacheConfiguration
org.springframework.boot.autoconfigure.cache.EhCacheCacheConfiguration
org.springframework.boot.autoconfigure.cache.HazelcastCacheConfiguration
org.springframework.boot.autoconfigure.cache.InfinispanCacheConfiguration
org.springframework.boot.autoconfigure.cache.CouchbaseCacheConfiguration
org.springframework.boot.autoconfigure.cache.RedisCacheConfiguration
org.springframework.boot.autoconfigure.cache.CaffeineCacheConfiguration
org.springframework.boot.autoconfigure.cache.GuavaCacheConfiguration
org.springframework.boot.autoconfigure.cache.SimpleCacheConfiguration(默认使用)
org.springframework.boot.autoconfigure.cache.NoOpCacheConfiguration
3、默认生效的配置类:SimpleCacheConfiguration
4、SimpleCacheConfiguration给容器中注册了一个CacheManager:ConcurrentMapCacheManager
@Configuration
@ConditionalOnMissingBean({CacheManager.class})
@Conditional({CacheCondition.class})
class SimpleCacheConfiguration {
private final CacheProperties cacheProperties;
private final CacheManagerCustomizers customizerInvoker;
SimpleCacheConfiguration(CacheProperties cacheProperties, CacheManagerCustomizers customizerInvoker) {
this.cacheProperties = cacheProperties;
this.customizerInvoker = customizerInvoker;
}
@Bean
public ConcurrentMapCacheManager cacheManager() {
ConcurrentMapCacheManager cacheManager = new ConcurrentMapCacheManager();
List<String> cacheNames = this.cacheProperties.getCacheNames();
if (!cacheNames.isEmpty()) {
cacheManager.setCacheNames(cacheNames);
}
return (ConcurrentMapCacheManager)this.customizerInvoker.customize(cacheManager);
}
}
1
2
3
4
5
6
7
8
9
10
11
12
13
14
15
16
17
18
19
20
21
22
23
5、通过ConcurrentMapCacheManager可以获取和创建ConcurrentMapCache类型的缓存组件:ConcurrentMapCache的作用是数据保存在ConcurrentMap中
6、@Cacheable运行流程:
①方法运行之前,先去查询Cache(缓存组件),按照cacheNames指定的名字获取(CacheManager先获取相应的缓存,第一次获取缓存如果没有Cache组件会自动创建)
②去Cache中查找缓存的内容,使用的key默认就是方法的参数:
key默认是使用keyGenerator生成的,默认使用的是SimpleKeyGenerator
SimpleKeyGenerator生成key的默认策略:
如果没有参数:key = new SimpleKey();
如果有一个参数:key = 参数的值
如果有多个参数:key = new SimpleKey(params);
③没有查到缓存就调用目标方法
④将目标方法返回的结果放进缓存中
总结:@Cacheable标注的方法在执行之前会先检查缓存中有没有这个数据,默认按照参数的值为key查询缓存,如果没有就运行方法并将结果放入缓存,以后再来调用时直接使用缓存中的数据。
核心:
1️⃣使用CacheManager(ConcurrentMapCacheManager)按照名字得到Cache(ConcurrentMapCache)组件
2️⃣key使用keyGenerator生成,默认使用SimpleKeyGenerator
四、@Cacheable的其他属性
1、cacheNames/value:指定缓存组件的名字,将方法的返回结果放在哪个缓存中,值是数组的方式,可以指定多个缓存
2、key:缓存数据使用的key,默认使用方法参数的值,可使用SpEL表达式计算(如key="#root.methodName+’[’+ #id +’]’")
3、keyGenerator:key的生成器,可以自定义key的生成器,key/keyGenerator二选一使用
自定义主键生成器:此处的KeyGenerator 是cache相关的接口,注意不要导错接口
@Configuration
public class MyCacheConfig {
@Bean("myKeyGenerator")
public KeyGenerator keyGenerator() {
return new KeyGenerator() {
@Override
public Object generate(Object o, Method method, Object... objects) {
return method.getName() + "[" + Arrays.asList(objects) + "]";
}
};
}
}
1
2
3
4
5
6
7
8
9
10
11
12
13
使用自定义的KeyGenerator:
@Cacheable(cacheNames = {"emp"},keyGenerator = "myKeyGenerator",,condition = "#id > 1 and #id < 10")
public Employee getEmpById(Integer id){
Employee emp = employeeMapper.getEmpById(id);
return emp;
}
1
2
3
4
5
4、 cacheManager:指定缓存管理器,或者cacheResolver指定获取解析器
5、condition:指定符合条件的情况下才缓存
6、unless:否定缓存,当unless指定的条件为true,方法的返回值就不会被缓存,可以获取到结果进行判断
7、sync:是否使用异步模式缓存
五、@CachePut
1、说明:既调用方法,又更新缓存数据,一般用于更新操作,在更新缓存时一定要和想更新的缓存有相同的缓存名称和相同的key(可类比同一张表的同一条数据)
2、运行时机:
①先调用目标方法
②将目标方法的结果缓存起来
3、示例:
@CachePut(value = "emp",key = "#employee.id")
public Employee updateEmp(Employee employee){
employeeMapper.updateEmp(employee);
return employee;
}
1
2
3
4
5
总结:@CachePut标注的方法总会被调用,且调用之后才将结果放入缓存,因此可以使用#result获取到方法的返回值(@Cacheable不可以使用#result,因为使用@Cacheable标注的方法不一定会被调用,可能获取不到result)。
六、@CacheEvict
1、说明:缓存清除,清除缓存时要指明缓存的名字和key,相当于告诉数据库要删除哪个表中的哪条数据,key默认为参数的值
2、属性:
value/cacheNames:缓存的名字
key:缓存的键
allEntries:是否清除指定缓存中的所有键值对,默认为false,设置为true时会清除缓存中的所有键值对,与key属性二选一使用
beforeInvocation:在@CacheEvict注解的方法调用之前清除指定缓存,默认为false,即在方法调用之后清除缓存,设置为true时则会在方法调用之前清除缓存(在方法调用之前还是之后清除缓存的区别在于方法调用时是否会出现异常,若不出现异常,这两种设置没有区别,若出现异常,设置为在方法调用之后清除缓存将不起作用,因为方法调用失败了)
3、示例:
@CacheEvict(value = "emp",key = "#id",beforeInvocation = true)
public void delEmp(Integer id){
employeeMapper.deleteEmpById(id);
}
1
2
3
4
七、@Caching
1、说明:是@Cacheable、@CachePut、@CacheEvict的组合,定义复杂的缓存规则,在这个组合中只要有@CachePut就一定会调用被注解的方法
@Target({ElementType.METHOD, ElementType.TYPE})
@Retention(RetentionPolicy.RUNTIME)
@Inherited
@Documented
public @interface Caching {
Cacheable[] cacheable() default {};
CachePut[] put() default {};
CacheEvict[] evict() default {};
}
1
2
3
4
5
6
7
8
9
10
11
2、示例:示例中在getEmpByLastName调用之后会向缓存中增加或修改对应的注解,key为对应指定的key,值为方法的返回值,注意只要方法上标注有@CachePut注解方法就一定会被调用
@Caching(
cacheable = {
@Cacheable(value = "emp", key = "#lastName")
},
put = {
@CachePut(value = "emp", key = "#result.id"),
@CachePut(value = "emp", key = "#result.email")
}
)
public Employee getEmpByLastName(String lastName) {
return employeeMapper.getEmpByLastName(lastName);
}
1
2
3
4
5
6
7
8
9
10
11
12
八、@CacheConfig
1、作用:标注在类上,抽取缓存相关注解的公共配置,可抽取的公共配置有缓存名字、主键生成器等(如注解中的属性所示)
@Target({ElementType.TYPE})
@Retention(RetentionPolicy.RUNTIME)
@Documented
public @interface CacheConfig {
String[] cacheNames() default {};
String keyGenerator() default "";
String cacheManager() default "";
String cacheResolver() default "";
}
1
2
3
4
5
6
7
8
9
10
11
12
2、示例:通过@CacheConfig的cacheNames 属性指定缓存的名字之后,该类中的其他缓存注解就不必再写value或者cacheName了,会使用该名字作为value或cacheName的值,当然也遵循就近原则
@Service
@CacheConfig(cacheNames = "emp")
public class EmployeeService {
@Autowired
EmployeeMapper employeeMapper;
@Cacheable
public Employee getEmpById(Integer id) {
Employee emp = employeeMapper.getEmpById(id);
return emp;
}
@CachePut(key = "#employee.id")
public Employee updateEmp(Employee employee) {
employeeMapper.updateEmp(employee);
return employee;
}
@CacheEvict(key = "#id", beforeInvocation = true)
public void delEmp(Integer id) {
employeeMapper.deleteEmpById(id);
}
@Caching(
cacheable = {
@Cacheable(key = "#lastName")
},
put = {
@CachePut(key = "#result.id"),
@CachePut(key = "#result.email")
}
)
public Employee getEmpByLastName(String lastName) {
return employeeMapper.getEmpByLastName(lastName);
}
}
1
2
3
4
5
6
7
8
9
10
11
12
13
14
15
16
17
18
19
20
21
22
23
24
25
26
27
28
29
30
31
32
33
34
35
36
37
九、搭建基于Redis的缓存
SpringBoot默认开启的缓存管理器是ConcurrentMapCacheManager,创建缓存组件是ConcurrentMapCache,将缓存数据保存在一个个的ConcurrentMap<Object, Object>中。开发时我们可以使用缓存中间件:redis、memcache、ehcache等,这些缓存中间件的启用很简单——只要向容器中加入相关的bean就会启用,可以启用多个缓存中间件。
Redis是一个开源(BSD许可)的,内存中的数据结构存储系统,它可以用作数据库、缓存和消息中间件。它支持多种类型的数据结构,如字符串(strings)、散列(hashes)、列表(lists)、集合(sets)、 有序集合(sorted sets)与范围查询、bitmaps、hyperloglogs和地理空间(geospatial)索引半径查询。Redis内置了复制(replication),LUA脚本(Lua scripting)、 LRU驱动事件(LRU eviction),事务(transactions)和不同级别的磁盘持久化(persistence),并通过 Redis哨兵(Sentinel)和自动分区(Cluster)提供高可用性(high availability)。关于Redis的命令操作可以参考:Redis命令
1、安装redis:使用docker安装,docker中国加速,加速方式参看:Docker中国加速
①拉取:
docker pull registry.docker-cn.com/library/redis
1
②启动容器:注意端口映射
docker run -d -p 6379:6379 --name myredis registry.docker-cn.com/library/redis
1
③连接测试:
2、整合Redis
①引入Redis的starter
<dependency>
<groupId>org.springframework.boot</groupId>
<artifactId>spring-boot-starter-data-redis</artifactId>
</dependency>
1
2
3
4
引入redis的starter之后,会在容器中加入redis相关的一些bean,其中有两个跟操作redis相关的:RedisTemplate和StringRedisTemplate(用来操作字符串:key和value都是字符串),template中封装了操作各种数据类型的操作(stringRredisTemplate.opsForValue()、stringRredisTemplate.opsForList()等)
@Configuration
@ConditionalOnClass({JedisConnection.class, RedisOperations.class, Jedis.class})
@EnableConfigurationProperties({RedisProperties.class})
public class RedisAutoConfiguration {
public RedisAutoConfiguration() {
}
@Configuration
protected static class RedisConfiguration {
protected RedisConfiguration() {
}
@Bean
@ConditionalOnMissingBean(
name = {"redisTemplate"}
)
public RedisTemplate<Object, Object> redisTemplate(RedisConnectionFactory redisConnectionFactory) throws UnknownHostException {
RedisTemplate<Object, Object> template = new RedisTemplate();
template.setConnectionFactory(redisConnectionFactory);
return template;
}
@Bean
@ConditionalOnMissingBean({StringRedisTemplate.class})
public StringRedisTemplate stringRedisTemplate(RedisConnectionFactory redisConnectionFactory) throws UnknownHostException {
StringRedisTemplate template = new StringRedisTemplate();
template.setConnectionFactory(redisConnectionFactory);
return template;
}
}
//...
}
1
2
3
4
5
6
7
8
9
10
11
12
13
14
15
16
17
18
19
20
21
22
23
24
25
26
27
28
29
30
31
32
②配置redis:只需要配置redis的主机地址(端口默认即为6379,因此可以不指定)
spring.redis.host=192.168.2.107
1
③测试:
@RunWith(SpringRunner.class)
@SpringBootTest
public class SpringbootCacheApplicationTests {
@Autowired
private RedisTemplate redisTemplate;
@Autowired
private StringRedisTemplate stringRedisTemplate;
@Test
public void contextLoads() {
stringRedisTemplate.opsForValue().append("msg","hengheng");
redisTemplate.opsForValue().set("a","aa");
}
}
1
2
3
4
5
6
7
8
9
10
11
12
13
14
15
使用redis存储对象时,该对象必须可序列化(实现Serializable接口),否则会报错,此时存储的结果在redis的管理工具中查看如下:由于序列化的原因值和键都变为了另外一只形式
SpringBoot默认采用的是JDK的对象序列化方式,我们可以切换为使用JSON格式进行对象的序列化操作,这时需要我们自定义序列化规则(当然我们也可以使用Json工具先将对象转化为Json格式之后再保存至redis,这样就无需自定义序列化),参考RedisAutoConfiguration向容器中加入RedisTemplate:修改下泛型参数
@Configuration
public class MyRedisConfig {
@Bean
public RedisTemplate<Object, Employee> empRedisTemplate(RedisConnectionFactory redisConnectionFactory) throws UnknownHostException {
RedisTemplate<Object, Employee> template = new RedisTemplate();
template.setConnectionFactory(redisConnectionFactory);
//这里选用Json格式的对象序列化器
Jackson2JsonRedisSerializer<Employee> serializer = new Jackson2JsonRedisSerializer<Employee>(Employee.class);
template.setDefaultSerializer(serializer);//设置默认的序列化器为Json序列化器
return template;
}
}
1
2
3
4
5
6
7
8
9
10
11
12
在使用时将新加入IOC容器的bean注入作为redisTemplate即可:
@RunWith(SpringRunner.class)
@SpringBootTest
public class SpringbootCacheApplicationTests {
@Autowired
private RedisTemplate redisTemplate;
@Autowired
private RedisTemplate<Object, Employee> empRedisTemplate;
@Autowired
private EmployeeMapper employeeMapper;
@Test
public void contextLoads() {
Employee empById = employeeMapper.getEmpById(1);
//使用JSon格式序列化
empRedisTemplate.opsForValue().set("emp-01",empById);
redisTemplate.opsForValue().set("emp-01",empById);
}
}
1
2
3
4
5
6
7
8
9
10
11
12
13
14
15
16
17
18
19
此时的结果:json格式
十、自定义CacheManager
1、使用SpringBoot提供的RedisCacheManager,在序列化数据的时候采用的是JDK的序列化机制,我们可以通过自定义CacheManager将数据的序列化改为JSON机制
@Configuration
public class MyRedisConfig {
@Bean
public RedisTemplate<Object, Employee> empRedisTemplate(RedisConnectionFactory redisConnectionFactory) throws UnknownHostException {
RedisTemplate<Object, Employee> template = new RedisTemplate();
template.setConnectionFactory(redisConnectionFactory);
//这里选用Json格式的对象序列化器
Jackson2JsonRedisSerializer<Employee> serializer = new Jackson2JsonRedisSerializer<Employee>(Employee.class);
template.setDefaultSerializer(serializer);//设置默认的序列化器为Json序列化器
return template;
}
//自定义CacheManager
@Bean
public RedisCacheManager empCacheManager(RedisTemplate<Object, Employee> empRedisTemplate) {
//将我们自定义的RedisTemplate作为参数,Spring会自动为我们注入
RedisCacheManager cacheManager = new RedisCacheManager(empRedisTemplate);
//使用前缀,默认会将CacheName作为key的前缀,最好设置为true,因为缓存可能有很多类
cacheManager.setUsePrefix(true);
return cacheManager;
}
}
1
2
3
4
5
6
7
8
9
10
11
12
13
14
15
16
17
18
19
20
21
22
但是如果我们仅仅自定义这一个CacheManager则只能操作Employee这一种类型的数据,因为这个CacheMananger只实现了Employee的泛型,操作其他类型就会报错(可以正常缓存其他类型的数据,但是从缓存中查询出的数据在反序列化时会报错)。
这时我们就需要自定义多个CacheManager,比如增加一个可以缓存Department类型的CacheMananger:
@Configuration
public class MyRedisConfig {
@Bean
public RedisTemplate<Object, Employee> empRedisTemplate(RedisConnectionFactory redisConnectionFactory) throws UnknownHostException {
RedisTemplate<Object, Employee> template = new RedisTemplate();
template.setConnectionFactory(redisConnectionFactory);
//这里选用Json格式的对象序列化器
Jackson2JsonRedisSerializer<Employee> serializer = new Jackson2JsonRedisSerializer<Employee>(Employee.class);
template.setDefaultSerializer(serializer);//设置默认的序列化器为Json序列化器
return template;
}
@Bean
public RedisTemplate<Object, Department> deptRedisTemplate(RedisConnectionFactory redisConnectionFactory) throws UnknownHostException {
RedisTemplate<Object, Department> template = new RedisTemplate();
template.setConnectionFactory(redisConnectionFactory);
//这里选用Json格式的对象序列化器
Jackson2JsonRedisSerializer<Department> serializer = new Jackson2JsonRedisSerializer<Department>(Department.class);
template.setDefaultSerializer(serializer);//设置默认的序列化器为Json序列化器
return template;
}
//自定义CacheManager
@Bean
@Primary//当容器中有多个RedisCacheManager的时候,需要指定一个默认的
public RedisCacheManager empCacheManager(RedisTemplate<Object, Employee> empRedisTemplate) {
//将我们自定义的RedisTemplate作为参数,Spring会自动为我们注入
RedisCacheManager cacheManager = new RedisCacheManager(empRedisTemplate);
//使用前缀,默认会将CacheName作为key的前缀
cacheManager.setUsePrefix(true);
return cacheManager;
}
@Bean
public RedisCacheManager deptCacheManager(RedisTemplate<Object, Department> deptRedisTemplate) {
RedisCacheManager cacheManager = new RedisCacheManager(deptRedisTemplate);
//使用前缀,默认会将CacheName作为key的前缀
cacheManager.setUsePrefix(true);
return cacheManager;
}
}
1
2
3
4
5
6
7
8
9
10
11
12
13
14
15
16
17
18
19
20
21
22
23
24
25
26
27
28
29
30
31
32
33
34
35
36
37
38
39
40
41
当容器中有多个RedisCacheManager的时候,需要使用@Primary指定一个默认的。
2、在使用缓存的时候使用cacheManager属性指明缓存管理器:若使用的是默认的cacheManager(使用@Primary标注)时可以不指定
//使用自定义的CacheManager的id,默认为方法名
@Service
@Cacheable(cacheNames = "dept",cacheManager = "deptCacheManager")
public class DepartmentService {
@Autowired
private DepartmentMapper departmentMapper;
public Department getDeptById(Integer id){
return departmentMapper.getDeptById(id);
}
}
1
2
3
4
5
6
7
8
9
10
11
12
3、有了自定义的缓存管理器CacheMananger,我们就可以在代码的任何地方进行缓存的存取操作(不需要使用@Cacheable等注解),只需要将缓存管理器注入,然后使用它获取缓存组件,再进行存取操作接口:
@Service
public class DepartmentService {
@Autowired
private DepartmentMapper departmentMapper;
@Autowired
@Qualifier("deptCacheManager")
private RedisCacheManager deptCacheManager;
public Department getDeptById(Integer id) {
Department department = departmentMapper.getDeptById(id);
//通过CacheMananger获取Cache,在获取的时候如果没有CacheMananger会自动为我们创建,无需我们手动创建Cache组件
Cache dept = deptCacheManager.getCache("dept");//改名字即为缓存的cacheName属性值
dept.put(id, department);
return department;
}
}
1
2
3
4
5
6
7
8
9
10
11
12
13
14
15
16
17
18
此处是向缓存中存值,也可以通过CacheManager获取到Cache然后再获取具体的缓存值。
如不來
关注
27
11
84
专栏目录
SpringBoot默认缓存配置案例及原理
hq.zheng的博客
6915
一、搭建基本环境 1)、创建表 2)、创建javaBean封装数据 package com.zhq.springboot.bean; public class Employee { private Integer id; private String lastName; private String email; private Integer gender; //性别 ...
Spring Boot集成Redis实现缓存机制(从零开始学Spring Boot)
08-30
主要介绍了Spring Boot集成Redis实现缓存机制(从零开始学Spring Boot),需要的朋友可以参考下