- A+
前言:非常感谢这位天狐博客的网友,其实他写的方法已经非常到位了,为了方便查找,我就写这篇文章供参考学习。
获取设备udid是实现超级签名的首要任务,也是其中重要的一环,下面介绍几种方法来对mobileconfig文件进行签名。
Safari获取设备udid需要安装.mobileconfig文件,
但是通常直接安装.mobileconfig文件后,会发现描述文件显示"未签名"或者“unsigned”等红色字样,所以接下来我们的主要工作就是让描述文件变成绿色的"已验证"字样。
方法一:导出苹果证书进行签名
1、从钥匙串(keychain)中导出证书:
实用工具->钥匙串访问->选择要导出的证书,导出生成p12文件 InnovCertificates.p12
然后转换成 InnovCertificates.pem 文件
2、p12证书转pem格式方法:
p12在线转换pem SSL Converter - Convert SSL Certificates to different formats
(证书)cer.p12文件 转cer.pem文件
openssl pkcs12 -clcerts -nokeys -out cer.pem -in cer.p12
(私钥)key.p12文件转key.pem文件
openssl pkcs12 -nocerts -out key.pem -inkey.p12
3、下载 Apple Root Certificate 和 Apple Intermediatediate Certificate:
(对于本篇文章 .mobileconfig文件的验证我使用了苹果的以下两个证书.
Apple Root Certificate(苹果根证书)
Apple Application Integration Certificate (苹果应用集成证书 )
你也可以使用这些证书或者苹果提供的其他证书 地址: http://www.apple.com/certificateauthority/
下载的文件中包括证书(cer)和私钥(key)
(在命令行中读取证书,参考链接 info.ssl.com/article.aspx?id=12149)
4、签名和验证.mobileconfig文件
在Mac终端cd到该路径下,执行如下命令:
openssl smime -sign -in Example.mobileconfig -out SignedVerifyExample.mobileconfig -signer InnovCertificates.pem -certfile root.crt.pem -outform der -nodetach
结果就得到已经签名且验证的.mobileconfig文件。
方法二:向服务端索要https服务器证书相关的两个文件,后缀名为.crt和.key两个文件
1、通过在线openssl工具把.crt和.key合成为.pem文件 pem格式转化
2、将.crt .key .pem文件放在同一文件夹目录下
3、在Mac终端cd到该路径下,执行如下命令:
openssl rsa -in ybs.key -out ybsnopass.key
此时文件夹下,会多出一个ybsnopass.key文件,然后终端再执行命令:
openssl smime -sign -in unsigned.mobileconfig -out signed.mobileconfig -signer ybs.crt -inkey ybsnopass.key -certfile ybs_ssl.pem -outform der -nodetach
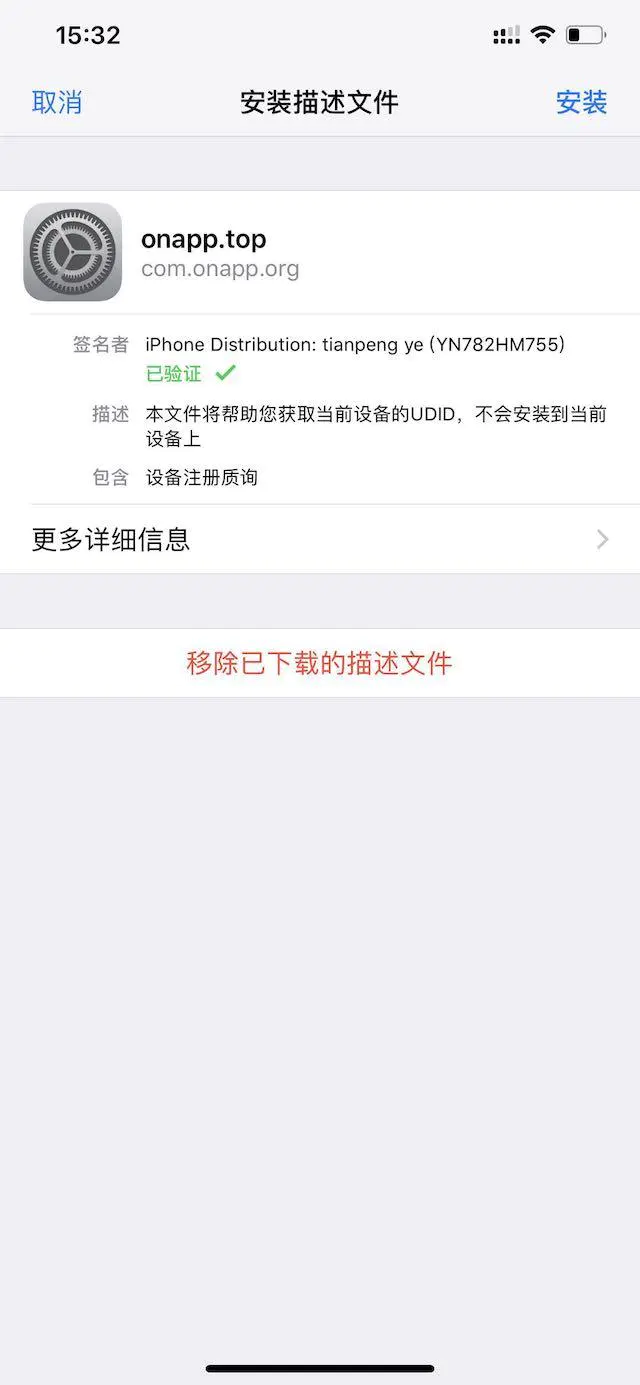
此时文件夹下会多出一个signed.mobileconfig,这便是我们签名后的.mobileconfig,将签名后的描述文件放到服务器,然后在safari中下载的描述文件的安装界面就会显示绿色的“已验证”。
方法三:脚本签名
借助于强大的github,找到了一个python脚本进行签名:地址:
1、签名.mobileconfig文件(AcrobatPro.mobileconfig为未签名的.mobileconfig文件)
profile_signer.py与 mobileconfig 放在同一目录,终端进入目录执行
./profile_signer.py -n "3rd Party Mac Developer Application" sign AcrobatPro.mobileconfig AcrobatProSigned.mobileconfig
2、加密.mobileconfig文件
./profile_signer.py -n "3rd Party Mac Developer Application" encrypt AcrobatPro.mobileconfig AcrobatProEnc.mobileconfig
3、签名且加密.mobileconfig文件
./profile_signer.py -n "3rd Party Mac Developer Application" both AcrobatPro.mobileconfig AcrobatProBoth.mobileconfig
"3rd Party Mac Developer Application"为你的证书在钥匙串中的全名,选择证书=>显示简介=>复制常用名称加上引号即可,比如
"iPhone Developer: jakey.shao xxxx@xxx.com"
"iPhone Distribution: Skyfox Network Technology Co., Ltd."
或者终端执行命令:security find-identity -p codesigning -v
可获得所有的证书
方法四:利用系统自带命令签名(证书一定在钥匙串中是信任的)
特别推荐此方法,简单暴力
1、打开终端,执行命令:security find-identity -p codesigning -v
可查看所有证书
2、签名描述文件
终端执行命令:
/usr/bin/security cms -S -N "iPhone Distribution: Skyfox Network Technology Co., Ltd." -i /Users/jakey/Desktop/udid_unsigned.mobileconfig -o /Users/jakey/Desktop/udid_signed.mobileconfig
方法五:ruby脚本签名
通过上述任何一个方法,都会得到一个已经签名且验证有“已验证”字样的.mobileconfig文件,如:
按照上述流程操作完成后得到一个有“尚未验证”红色字体的.mobileconfig文件可能原因是选择的签名证书已经过期或者失效,删除该证书重新添加证书再重新操作一遍即可,或者直接点击该红色字体查看具体原因