- A+
本文基于 Spring Boot 3.0.0 (Spring 6.0.2),Bean 指的是 Singleton Bean。
宏观地说,Bean 加载流程大致有三个阶段,分别是实例化 createBeanInstance() 、属性填充 populateBean() 和 初始化 initializeBean(),当 Bean 加载流程执行完毕,Bean 才具备使用条件!对 Bean 加载流程的探索是一段非常煎熬的旅程,你准备好了吗?

1 写在前面
为了让 Spring IoC 容器正确地完成 Bean 加载流程,必须要有一个数据模型来承载 Bean 的配置元数据,配置元数据可以告诉 Spring IoC 容器 如何创建 Bean 实例、何时创建 Bean 实例 和 Bean 的生命周期细节 等信息,这个数据模型就是BeanDefinition接口,在其众多实现类中,RootBeanDefinition 最为常用!
在 Spring Boot 中,BeanDefinition 可以归纳为两类:一种是由开发人员声明的,另一种是由官方及第三方起步依赖 starter 组件中声明的,当然这两种 BeanDefinition 一般都是通过注解声明的。为了加载这两种 BeanDefinition,Spring Boot 会率先完成一个名为
org.springframework.context.annotation.internalConfigurationAnnotationProcessor 、
ConfigurationClassPostProcessor类型的 Bean 加载流程。ConfigurationClassPostProcessor 实现了BeanDefinitionRegistryPostProcessor接口。
public interface BeanDefinitionRegistryPostProcessor extends BeanFactoryPostProcessor {
    void postProcessBeanDefinitionRegistry(BeanDefinitionRegistry registry);
}
BeanDefinitionRegistryPostProcessor 继承自BeanFactoryPostProcessor接口,后者是一个极其重要的 Spring IoC 拓展点。
public interface BeanFactoryPostProcessor {
    void postProcessBeanFactory(ConfigurableListableBeanFactory beanFactory);
}
BeanFactoryPostProcessor 常用于与 BeanDefinition 交互,而非与 Bean 实例交互,因为当执行到postProcessBeanFactory()方法时,只是完成了所有 BeanDefinition 的加载而已,Bean 还没有实例化呢。我们完全可以通过 BeanFactoryPostProcessor 将某一 BeanDefinition 实例的 beanClass 属性值替换为CGLIB所生成的 Class 实例,这样后期通过该 BeanDefinition 实例所生成的 Bean 实例就得到增强了。
当执行到
ConfigurationClassPostProcessor 中的postProcessBeanDefinitionRegistry()方法时,Spring Boot 已经提前将由@SpringBootApplication注解标注的启动类注册到了BeanDefinitionRegistry中去,那么
ConfigurationClassPostProcessor 会根据这个启动类来挖掘出所有的 BeanDefinition,接着将它们注册到 BeanDefinitionRegistry 中。
为什么一个由 @SpringBootApplication 注解标注的启动类可以衍生出全部的 BeanDefinition 呢?因为它头上有三个重要的元注解,分别是:@SpringBootConfiguration、@EnableAutoConfiguration和@ComponentScan。其中,@ComponentScan 注解用于衍生出 classpath 下特定包名内的 BeanDefinition,一般这个包名就是 Spring Boot 启动类所在的包名,这也正是为什么启动类总是处于顶级包名下的答案;而 @EnableAutoConfiguration 注解则用于衍生出官方及第三方起步依赖组件中的 BeanDefinition,如果没有这个注解,那么一切官方及第三方 starter 组件都会趴窝。
继续回到
ConfigurationClassPostProcessor 中来。限于篇幅这里仅放出其核心外围源码,如下所示。其中,postProcessBeanDefinitionRegistry() 方法是先于 postProcessBeanFactory() 方法执行的。
public class ConfigurationClassPostProcessor implements BeanDefinitionRegistryPostProcessor {
    /**
     * Derive further bean definitions from the configuration classes in the registry.
     */
    @Override
    public void postProcessBeanDefinitionRegistry(BeanDefinitionRegistry registry) {
        processConfigBeanDefinitions(registry);
    }

    /**
     * Prepare the Configuration classes for servicing bean requests at runtime
     * by replacing them with CGLIB-enhanced subclasses.
     */
    @Override
    public void postProcessBeanFactory(ConfigurableListableBeanFactory beanFactory) {
        enhanceConfigurationClasses(beanFactory);
        beanFactory.addBeanPostProcessor(new ImportAwareBeanPostProcessor(beanFactory));
    }
}
1.1 postProcessBeanDefinitionRegistry()
postProcessBeanDefinitionRegistry() 方法无疑是 ConfigurationClassPostProcessor 中最为核心的内容,它可以将那些由开发人员和起步依赖组件中所声明的 BeanDefinition 全部加载出来,并将其注册到 BeanDefinitionRegistry 中去。
Spring 提供了一个 ConfigurationClass类,用于抽象那些由 @Configuration 注解标记的配置类。metadata 属性用于标识配置类头上的注解元数据;beanMethods 属性用于收集配置类中由 @Bean 注解标识的方法;importedBy 用于收集当前配置类是由哪些配置类通过 @Import 注解引入的;importedResources 属性用于收集当前配置类通过 @ImportResource 注解所引入的包含若干 Bean 定义信息的 XML 文件;
importBeanDefinitionRegistrars 属性用于收集当前配置类通过 @Import 注解引入的
ImportBeanDefinitionRegistrar。
public final class ConfigurationClass {
    private final AnnotationMetadata metadata;
    private final Resource resource;
    private String beanName;
    private final Set<ConfigurationClass> importedBy = new LinkedHashSet<>(1);
    private final Set<BeanMethod> beanMethods = new LinkedHashSet<>();
    private final Map<String, Class<? extends BeanDefinitionReader>> importedResources =
            new LinkedHashMap<>();
    private final Map<ImportBeanDefinitionRegistrar, AnnotationMetadata> importBeanDefinitionRegistrars =
            new LinkedHashMap<>();
}
第一个 ConfigurationClass 实例就是 Spring Boot 的启动类!
ConfigurationClassPostProcessor 会委托ConfigurationClassParser来解析 ConfigurationClass 实例以填充其属性,而一个 ConfigurationClass 实例可能衍生出若干个 ConfigurationClass 实例,最终这些 ConfigurationClass 实例会被保存在 ConfigurationClassParser 中的成员变量 configurationClasses 中,然后
ConfigurationClassPostProcessor 会委派ConfigurationClassBeanDefinitionReader 负责将每一个 ConfigurationClass 实例中所蕴含的 BeanDefinition 加载出来。
相较于 BeanDefinitionReader 对 BeanDefinition 的加载,ConfigurationClassParser 对 ConfigurationClass 的解析更为吸引人,这一过程涉及对nested member class、@PropertySource、@ComponentScan、@Import、@ImportResource、@Bean 和 default methods on interfaces 这七个目标的解析。
-
nested member class 指的是当前 ConfigurationClass 的嵌套成员静态配置类,这些配置类的头上如果有 @Component、@ComponentScan、@Import、和 @ImportResource 这四种注解任意一种标记,或者其包含由 @Bean 注解标记的方法,那么 ConfigurationClassParser 会将其封装为一个 ConfigurationClass 实例,然后对其进行递归解析。
-
@PropertySource 注解常用于引入一个或多个外部配置源文件,ConfigurationClassParser 会将每一个外部配置源文件封装为一个PropertySource实例,然后直接将其塞进Environment中。
-
对于 @ComponentScan 注解,ConfigurationClassParser 首先委派 ComponentScanAnnotationParser 进行扫描。具体地,ComponentScanAnnotationParser 会根据 @ComponentScan 注解中 basePackages 与 basePackageClasses 这俩属性来探测出所要扫描的包名,如果没有获取到,就根据 @ComponentScan 注解所依附宿主类的包名作为扫描目标;然后将目标包下所有由 @Component 注解标注的类扫描出来并封装为 BeanDefinition 实例,接着逐个将 BeanDefinition 实例注册到 BeanDefinitionRegistry 中。
-
@Import 注解用于引入外部配置类,外部配置类可以是由 @Configuration 注解标记的常规配置类,也可以是 ImportSelector 和 ImportBeanDefinitionRegistrar 接口的实现类。processImports() 方法正是 ConfigurationClassParser 处理这三类目标的核心逻辑所在。其主要逻辑为:1) 如果引入的是纯 ImportSelector,则递归调用 processImports() 方法;2) 如果引入的是 DeferredImportSelector,则延迟处理;3) 如果引入的是 ImportBeanDefinitionRegistrar,则填充当前 ConfigurationClass 实例中的 importBeanDefinitionRegistrars 属性;4) 如果引入的是普通 @Configuration 配置类,则构建一个新的 ConfigurationClass 实例然后递归解析该 ConfigurationClass 实例。
-
@ImportResource 注解常用于引入一个或多个包含若干 Bean 定义信息的 XML 文件。一般大家是用不到这个注解的,但有些老的模块可能依然是通过 XML 文件来声明 Bean 定义信息,那么 @ImportResource 注解恰好提供了这种兼容能力。ConfigurationClassParser 正是在这里填充当前 ConfigurationClass 实例的 importedResources 属性。
-
对于方法级的 @Bean 注解,ConfigurationClassParser 会为其封装为 BeanMethod 实例,然后将其回填到当前 ConfigurationClass 实例的 beanMethods 属性中。
-
default methods on interfaces 指的是 Java 8 接口中由default关键字修饰的默认方法。ConfigurationClassParser 会获取当前 ConfigurationClass 所实现的接口,然后探测出接口中所有 @Bean 方法,依然是填充当前 ConfigurationClass 实例的 beanMethods 属性。
1.2 postProcessBeanFactory()
当执行到 postProcessBeanFactory() 方法,这意味着所有的 BeanDefinition 已经完成了加载,它们都安静地躺在 BeanDefinitionRegistry 中。 而
enhanceConfigurationClasses()方法是 postProcessBeanFactory() 方法中的唯一逻辑,咱们一起来瞅瞅它干了啥吧。
public class ConfigurationClassPostProcessor implements BeanDefinitionRegistryPostProcessor {
    public void enhanceConfigurationClasses(ConfigurableListableBeanFactory beanFactory) {
        Map<String, AbstractBeanDefinition> configBeanDefs = new LinkedHashMap<>();
        for (String beanName : beanFactory.getBeanDefinitionNames()) {
            BeanDefinition beanDef = beanFactory.getBeanDefinition(beanName);
            Object configClassAttr = beanDef.getAttribute(ConfigurationClassUtils.CONFIGURATION_CLASS_ATTRIBUTE);
            if ("full".equals(configClassAttr)) {
                configBeanDefs.put(beanName, abd);
            }
        }
        if (configBeanDefs.isEmpty()) {
            return;
        }
        ConfigurationClassEnhancer enhancer = new ConfigurationClassEnhancer();
        for (Map.Entry<String, AbstractBeanDefinition> entry : configBeanDefs.entrySet()) {
            AbstractBeanDefinition beanDef = entry.getValue();
            // Set enhanced subclass of the user-specified bean class
            Class<?> configClass = beanDef.getBeanClass();
            Class<?> enhancedClass = enhancer.enhance(configClass, this.beanClassLoader);
            if (configClass != enhancedClass) {
                beanDef.setBeanClass(enhancedClass);
            }
        }
    }
}
代码不多,理解起来很容易。遍历所有 BeanDefinition 实例,将所有包含 key 为
ConfigurationClassUtils.CONFIGURATION_CLASS_ATTRIBUTE、value 为 full 的 BeanDefinition 实例 收集到局部变量 configBeanDefs 中,然后使用 CGLIB 生成全新的 Class 实例并替换 BeanDefinition 实例的 beanClass 属性值,后续这些 Bean 均将会被代理类增强。
以 key 为
ConfigurationClassUtils.CONFIGURATION_CLASS_ATTRIBUTE、value 为 full 的键值对儿是啥时候塞到 BeanDefinition 实例的 attribute 中去的呢?当然是在
postProcessBeanDefinitionRegistry() 方法中塞进去的,主要内容如下。
public abstract class ConfigurationClassUtils {
    public static boolean checkConfigurationClassCandidate(BeanDefinition beanDef, MetadataReaderFactory metadataReaderFactory) {
        String className = beanDef.getBeanClassName();
        if (className == null || beanDef.getFactoryMethodName() != null) {
            return false;
        }
        AnnotationMetadata metadata;
        if (beanDef instanceof AnnotatedBeanDefinition
                && className.equals(((AnnotatedBeanDefinition) beanDef).getMetadata().getClassName())) {
            metadata = ((AnnotatedBeanDefinition) beanDef).getMetadata();
        } else if (beanDef instanceof AbstractBeanDefinition && ((AbstractBeanDefinition) beanDef).hasBeanClass()) {
            Class<?> beanClass = ((AbstractBeanDefinition) beanDef).getBeanClass();
            if (BeanFactoryPostProcessor.class.isAssignableFrom(beanClass) ||
                    BeanPostProcessor.class.isAssignableFrom(beanClass) ||
                    AopInfrastructureBean.class.isAssignableFrom(beanClass) ||
                    EventListenerFactory.class.isAssignableFrom(beanClass)) {
                return false;
            }
            metadata = AnnotationMetadata.introspect(beanClass);
        } else {
            MetadataReader metadataReader = metadataReaderFactory.getMetadataReader(className);
            metadata = metadataReader.getAnnotationMetadata();
        }
        Map<String, Object> config = metadata.getAnnotationAttributes(Configuration.class.getName());
        if (config != null && !Boolean.FALSE.equals(config.get("proxyBeanMethods"))) {
            beanDef.setAttribute(CONFIGURATION_CLASS_ATTRIBUTE, CONFIGURATION_CLASS_FULL);
        } else if (config != null || isConfigurationCandidate(metadata)) {
            beanDef.setAttribute(CONFIGURATION_CLASS_ATTRIBUTE, CONFIGURATION_CLASS_LITE);
        } else {
            return false;
        }
        Integer order = getOrder(metadata);
        if (order != null) {
            beanDef.setAttribute(ORDER_ATTRIBUTE, order);
        }
        return true;
    }
}
忽略 根据 BeanDefinition 获取其 AnnotationMetadata 的逻辑,从上面代码中,我们可以很轻松地总结出以下规律:
-
若 @Configuration 注解中 proxyBeanMethods 属性值为 true,则执行 beanDef.setAttribute(CONFIGURATION_CLASS_ATTRIBUTE, "full");
-
若 @Configuration 注解中 proxyBeanMethods 属性值为 false,则执行 beanDef.setAttribute(CONFIGURATION_CLASS_ATTRIBUTE, "lite")。
经过第一章节的分析,我们大致了解了 BeanDefinition 的加载逻辑,接下来将会面临更大的挑战,就是对 Bean 加载流程的探索。
2 实例化
BeanFactory是 Spring 针对 IoC 容器提供的最顶级抽象接口,其主要用于加载 Bean。众所周知,相较于 BeanFactory,ApplicationContext拥有更多的拓展功能,因此后者在企业级应用中更为常用,但今天笔者想给大家介绍 BeanFactory 的另一个拓展,即
AutowireCapableBeanFactory。AutowireCapableBeanFactory 提供了两个重要的方法,分别是:createBean()和autowireBean()。createBean() 方法可以用于构建一个不受 IoC 容器纳管的 Bean 实例,而且在实例化 Bean 之后,也会进行 populateBean() 和 initializeBean() 操作;而 autowireBean() 方法就更为有用了,它可以为那些头上没有 stereotype 注解的普通类注入 IoC 容器中的单例 Bean,这很酷对不对?
回归正题!Bean 加载的统一入口位于AbstractBeanFactory中的getBean()方法处,熟悉 Spring 的朋友应该都知道:真正干活的往往是那些 doXXX 开头的方法。这里也不例外,doGetBean()方法源码内容如下。
public abstract class AbstractBeanFactory extends FactoryBeanRegistrySupport implements ConfigurableBeanFactory {
    @Override
    public Object getBean(String name) throws BeansException {
        return doGetBean(name, null, null, false);
    }

    @Override
    public <T> T getBean(String name, Class<T> requiredType) throws BeansException {
        return doGetBean(name, requiredType, null, false);
    }

    @Override
    public Object getBean(String name, Object... args) throws BeansException {
        return doGetBean(name, null, args, false);
    }

    public <T> T getBean(String name, Class<T> requiredType, Object... args) throws BeansException {
        return doGetBean(name, requiredType, args, false);
    }

    protected <T> T doGetBean(String name, Class<T> requiredType, Object[] args, boolean typeCheckOnly) throws BeansException {
        // § 2.1
        String beanName = transformedBeanName(name);
        Object beanInstance;

        // § 2.2
        Object sharedInstance = getSingleton(beanName);
        if (sharedInstance != null && args == null) {
            // § 2.3
            beanInstance = getObjectForBeanInstance(sharedInstance, name, beanName, null);
        } else {
            // § 2.4
            BeanFactory parentBeanFactory = getParentBeanFactory();
            if (parentBeanFactory != null && !containsBeanDefinition(beanName)) {
                // Not found -> check parent.
                String nameToLookup = originalBeanName(name);
                if (parentBeanFactory instanceof AbstractBeanFactory abf) {
                    return abf.doGetBean(nameToLookup, requiredType, args, typeCheckOnly);
                } else if (args != null) {
                    return (T) parentBeanFactory.getBean(nameToLookup, args);
                } else if (requiredType != null) {
                    return parentBeanFactory.getBean(nameToLookup, requiredType);
                } else {
                    return (T) parentBeanFactory.getBean(nameToLookup);
                }
            }

            // § 2.5
            if (!typeCheckOnly) {
                markBeanAsCreated(beanName);
            }

            try {
                RootBeanDefinition mbd = getMergedLocalBeanDefinition(beanName);

                // § 2.6
                String[] dependsOn = mbd.getDependsOn();
                if (dependsOn != null) {
                    for (String dep : dependsOn) {
                        if (isDependent(beanName, dep)) {
                            throw new BeanCreationException(mbd.getResourceDescription(), beanName,
                                    "Circular depends-on relationship between '" + beanName + "' and '" + dep + "'");
                        }
                        registerDependentBean(dep, beanName);
                        try {
                            getBean(dep);
                        } catch (NoSuchBeanDefinitionException ex) {
                            throw new BeanCreationException(mbd.getResourceDescription(), beanName,
                                    "'" + beanName + "' depends on missing bean '" + dep + "'", ex);
                        }
                    }
                }

                // § 2.7
                if (mbd.isSingleton()) {
                    sharedInstance = getSingleton(beanName, () -> {
                        try {
                            return createBean(beanName, mbd, args);
                        } catch (BeansException ex) {
                            destroySingleton(beanName);
                            throw ex;
                        }
                    });
                    beanInstance = getObjectForBeanInstance(sharedInstance, name, beanName, mbd);
                }
            } catch (BeansException ex) {
                cleanupAfterBeanCreationFailure(beanName);
                throw ex;
            }
        }

        // § 2.8
        return adaptBeanInstance(name, beanInstance, requiredType);
    }
}
代码很多,笔者已经在核心内容上打了标签 ( § 2.1 - § 2.8 ),下面就以这些标签作为独立的小节,逐一分析这些核心内容。
§ 2.1 转换 beanName
transformedBeanName() 方法会对传进来的 beanName 进行转换。如果传进来的 beanName 以 & 为前缀,那么这里会移除该前缀;如果传进来的 beanName 是某一个 Bean 的 aliasName,那么找到该 aliasName 真正所指向的 beanName。
一般情况下,Spring 结合 BeanDefinition 实例中的 beanClass 属性与反射机制来实例化 Bean。但某些情况下,实例化 Bean 的过程比较复杂,直接通过反射构建出来的实例没有太多意义。Spring 为此提供了一个可以灵活配置实例化 Bean 的方案,这一方案隐藏了实例化复杂 Bean 的细节,它就是大名鼎鼎的FactoryBean接口。getObject() 方法用于返回当前 FactoryBean 所创建的复杂 Bean 的实例。
public interface FactoryBean<T> {
    T getObject() throws Exception;
    Class<?> getObjectType();
    default boolean isSingleton() { return true; }
}
Spring 自身针对 FactoryBean 接口就提供了多达 50+ 种实现类,咱们拿
Jackson2ObjectMapperFactoryBean这个实现类来展开讲讲 FactoryBean 的应用场景。ObjectMapper是 Jackson 暴露给开发人员使用的核心序列化 API,在使用 ObjectMapper 之前,往往需要一些配置,毕竟一个裸的 ObjectMapper 实例很可能会有一些坑,更何况 Spring 对定制化配置 ObjectMapper 的诉求更为强烈,因此我们可以认为 ObjectMapper 这个 Bean 的实例化是复杂的。大家可以自行阅读 Jackson2ObjectMapperFactoryBean 类的源码,还是蛮清晰的。
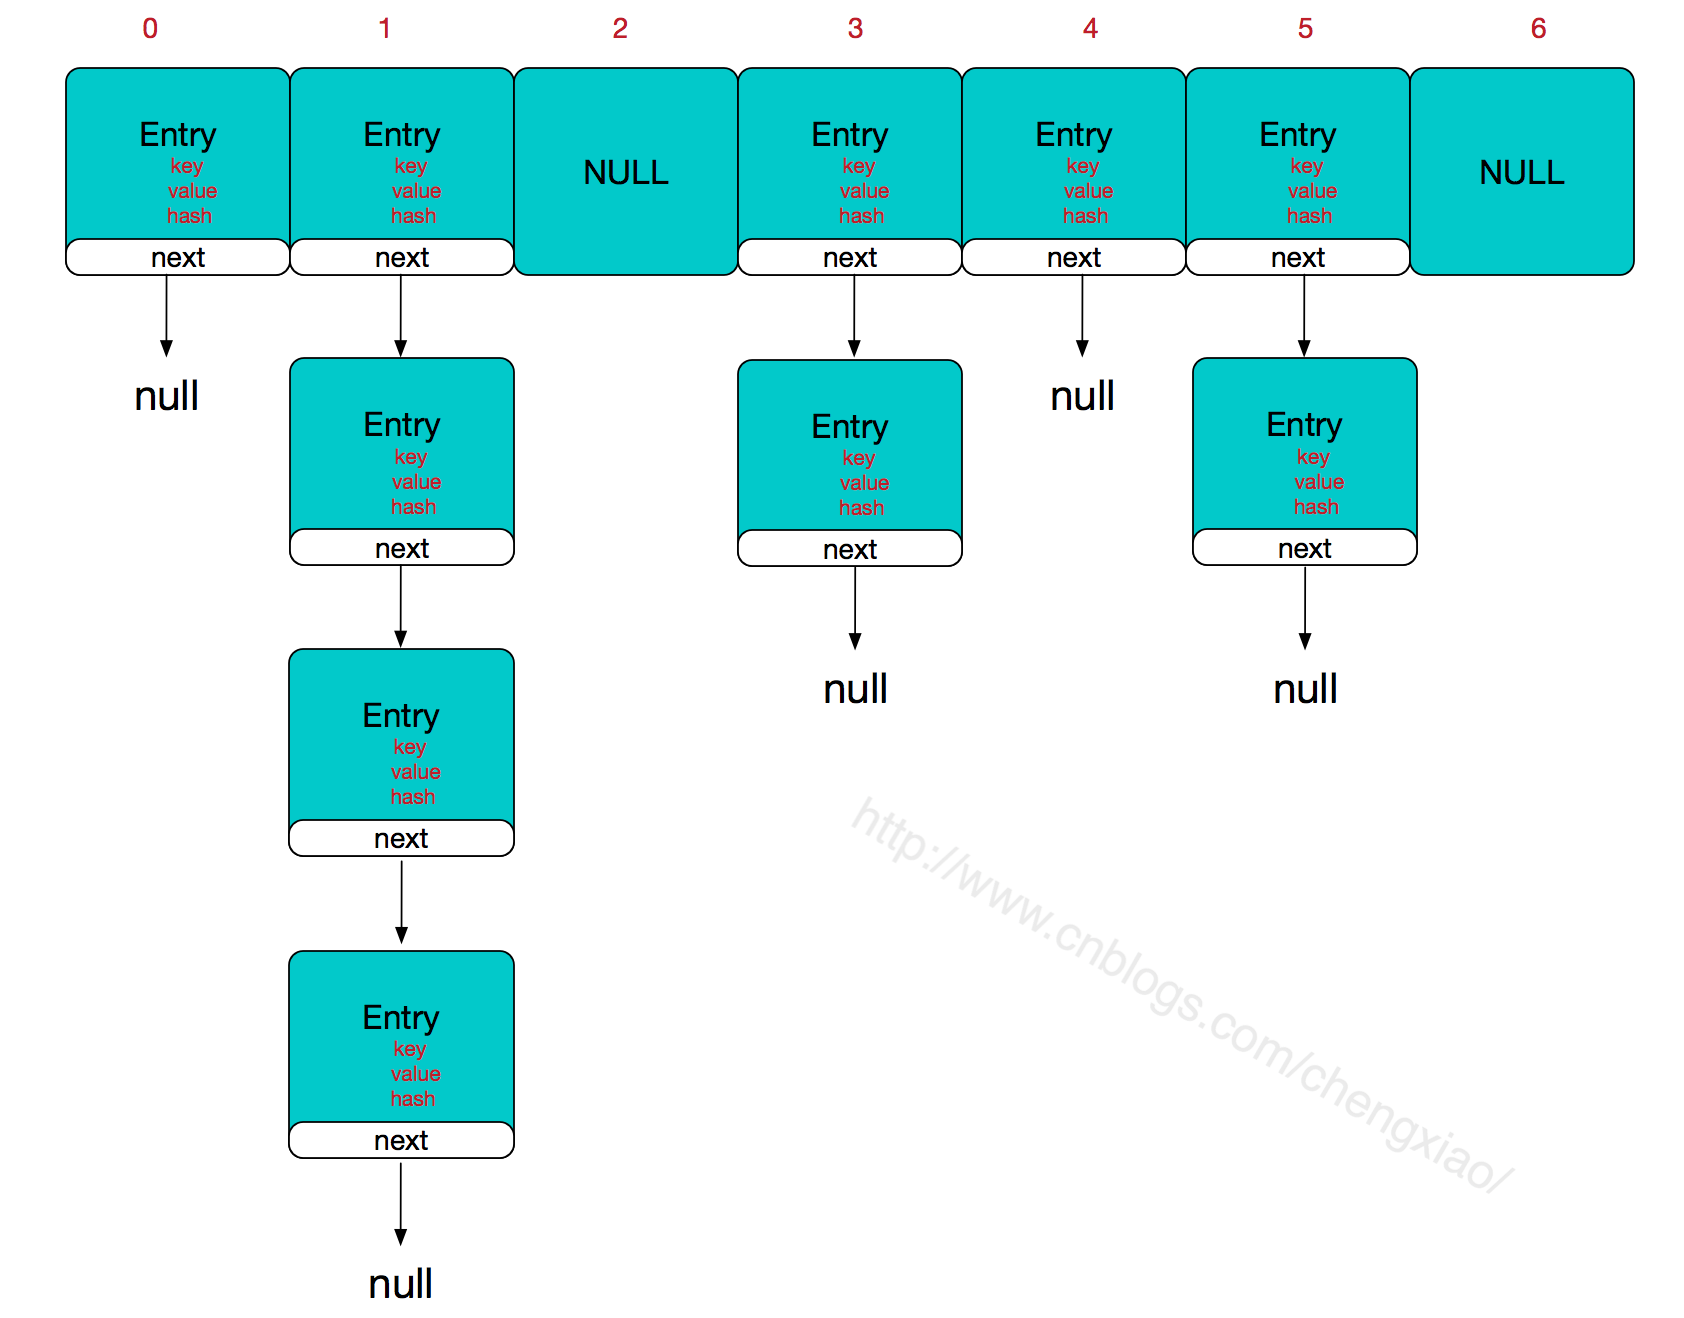
§ 2.2 尝试从多级缓存中加载 Bean 实例
getSingleton(beanName) 方法会尝试从多级缓存中加载 Bean。缓存共计三级,分别是一级缓存singletonObjects、二级缓存earlySingletonObjects和三级缓存singletonFactories。
public class DefaultSingletonBeanRegistry extends SimpleAliasRegistry implements SingletonBeanRegistry {
    // First cache.
    private final Map<String, Object> singletonObjects = new ConcurrentHashMap<>(256);
    // Second cache.
    private final Map<String, Object> earlySingletonObjects = new ConcurrentHashMap<>(16);
    // Third cache.
    private final Map<String, ObjectFactory<?>> singletonFactories = new HashMap<>(16);
    // Names of beans that are currently in creation.
    private final Set<String> singletonsCurrentlyInCreation = Collections.newSetFromMap(new ConcurrentHashMap<>(16));

    public Object getSingleton(String beanName) {
        return getSingleton(beanName, true);
    }

    protected Object getSingleton(String beanName, boolean allowEarlyReference) {
        Object singletonObject = this.singletonObjects.get(beanName);
        if (singletonObject == null && isSingletonCurrentlyInCreation(beanName)) {
            singletonObject = this.earlySingletonObjects.get(beanName);
            if (singletonObject == null && allowEarlyReference) {
                synchronized (this.singletonObjects) {
                    singletonObject = this.singletonObjects.get(beanName);
                    if (singletonObject == null) {
                        singletonObject = this.earlySingletonObjects.get(beanName);
                        if (singletonObject == null) {
                            ObjectFactory<?> singletonFactory = this.singletonFactories.get(beanName);
                            if (singletonFactory != null) {
                                singletonObject = singletonFactory.getObject();
                                this.earlySingletonObjects.put(beanName, singletonObject);
                                this.singletonFactories.remove(beanName);
                            }
                        }
                    }
                }
            }
        }
        return singletonObject;
    }
}
上述源码涉及三种 Map 类型的多级缓存,的确有些让人崩溃 (后面会解答),但总体逻辑还是清晰的。
-
首先从一级缓存 singletonObjects 中获取 Bean 实例,如果获取到了,则直接返回。
-
如果从一级缓存中未获取到且当前 Bean 正处于加载流程中,然后从二级缓存 earlySingletonObjects 里面获取,如果获取到了,则直接返回。
-
如果从二级缓存中还是没有获取到的话,那么从三级缓存 singletonFactory 里获取与 beanName 匹配的 ObjectFactory,接着调用 ObjectFactory 的getObject()方法来获取提前暴露的 Bean 实例 ( 如果需要为其生成代理,那此时还会为原始 Bean 实例生成代理类;此外,此时的 Bean 实例是一种早期状态,仅仅是实例化 createBeanInstance() 了而已,还未开始执行属性填充 populateBean() 和初始化 initializeBean() 这俩流程 ) ,最后将这一提前暴露的 Bean 实例放到二级缓存中,同时删除三级缓存中的内容。
当一个 Bean 实例被塞进一级缓存中,这意味着该 Bean 已经完成了加载流程,即走完了实例化 createBeanInstance()、属性填充 populateBean() 和初始化 initializeBean() 流程,真正具备使用的条件了;此外,一级缓存也是确保单例 Bean 在 Spring IoC 容器中唯一性的关键,因此一级缓存中的内容是不会删除的。
§ 2.3 Bean 实例是否是最终想要的
不论 Bean 实例是直接从多级缓存中拿到的,还是直接创建的,并不一定就是我们想要的。因此,在拿到 Bean 实例之后,第一件事就是执行getObjectFromFactoryBean()方法。
public abstract class AbstractBeanFactory extends FactoryBeanRegistrySupport implements ConfigurableBeanFactory {
    protected Object getObjectForBeanInstance(Object beanInstance, String name, String beanName, RootBeanDefinition mbd) {
        // String FACTORY_BEAN_PREFIX = "&"
        // name != null && name.startsWith(BeanFactory.FACTORY_BEAN_PREFIX)
        if (BeanFactoryUtils.isFactoryDereference(name)) {
            // name 是未经 transformedBeanName() 方法转换过的
            // 如果 name 以 & 为前缀,但 Bean 实例却又不是 FactoryBean 类型的,那只能抛出异常了
            if (!(beanInstance instanceof FactoryBean)) {
                throw new BeanIsNotAFactoryException(beanName, beanInstance.getClass());
            }
            if (mbd != null) {
                mbd.isFactoryBean = true;
            }
            // name 以 & 为前缀,说明当前 FactoryBean 类型的 Bean 实例就是最终想要的,直接返回即可
            return beanInstance;
        }

        // name 不以 & 为前缀
        // 如果当前 Bean 实例不是 FactoryBean 类型的,则直接返回该 Bean 实例
        if (!(beanInstance instanceof FactoryBean<?> factoryBean)) {
            return beanInstance;
        }

        // 执行到这里,说明 name 不以 & 为前缀,但当前 Bean 实例是 FactoryBean 类型的
        // 进一步说明:FactoryBean#getObject() 返回的 Bean 实例才是最终想要的
        Object object = null;
        if (mbd != null) {
            mbd.isFactoryBean = true;
        }
        if (object == null) {
            if (mbd == null && containsBeanDefinition(beanName)) {
                mbd = getMergedLocalBeanDefinition(beanName);
            }
            boolean synthetic = (mbd != null && mbd.isSynthetic());
            // 核心逻辑
            object = getObjectFromFactoryBean(factoryBean, beanName, !synthetic);
        }
        return object;
    }
}
getObjectFromFactoryBean() 方法主要逻辑有:
-
如果 name 以 & 为前缀且 Bean 实例是 BeanFactory 类型的,那当前 Bean 实例就是最终想要的。
-
如果 name 不以 & 为前缀且 Bean 实例不是 BeanFactory 类型的,那当前 Bean 实例就是最终想要的。
-
如果 name 不以 & 为前缀但 Bean 实例是 BeanFactory 类型的,那当前 Bean 实例并不是最终想要的,故而委派 getObjectFromFactoryBean() 方法来匹配最终想要的 Bean 实例。
很遗憾,当继续跟进到 getObjectFromFactoryBean() 方法中后,并没有我们想要看到的内容,但潜意识觉得
doGetObjectFromFactoryBean() 方法就是答案了,果然没让我们失望!
public abstract class FactoryBeanRegistrySupport extends DefaultSingletonBeanRegistry {
    private Object doGetObjectFromFactoryBean(FactoryBean<?> factory, String beanName) throws BeanCreationException {
        Object object;
        try {
            object = factory.getObject();
        } catch (FactoryBeanNotInitializedException ex) {
            throw new BeanCurrentlyInCreationException(beanName, ex.toString());
        } catch (Throwable ex) {
            throw new BeanCreationException(beanName, "FactoryBean threw exception on object creation", ex);
        }
        return object;
    }
}
复制代码
§ 2.4 尝试从 parentBeanFactory 中加载 Bean
既然从多级缓存中没有获取到 Bean 实例,那只能从头开始、完整地走一遍 Bean 加载流程了,但 Spring 好像还不死心,想要试图从parentBeanFactory拿到。如果 parentBeanFactory 存在,则递归调用 getBean() 方法。
§ 2.5 提前标识当前 Bean 加载流程已完结
当程序执行到这里,说明确实要从头开始、完整地走一遍 Bean 加载流程,markBeanAsCreated()方法用于提前标识当前 Bean 加载流程已完结,毕竟接下来肯定要真正触发 Bean 加载流程的。
public abstract class AbstractBeanFactory extends FactoryBeanRegistrySupport implements ConfigurableBeanFactory {
    // Map from bean name to merged RootBeanDefinition.
    private final Map<String, RootBeanDefinition> mergedBeanDefinitions = new ConcurrentHashMap<>(256);
    // Names of beans that have already been created at least once.
    private final Set<String> alreadyCreated = Collections.newSetFromMap(new ConcurrentHashMap<>(256));

    protected void markBeanAsCreated(String beanName) {
        if (!this.alreadyCreated.contains(beanName)) {
            synchronized (this.mergedBeanDefinitions) {
                this.alreadyCreated.add(beanName);
            }
        }
    }
}
§ 2.6 优先加载由 @DependsOn 注解标识的依赖 Bean
如果对 Bean A 的加载需要确保另一个 Bean B 已经加载完毕,而且 Bean B 并不是 Bean A 中所持有的成员变量,那就可以使用 @DependsOn 注解来满足这一需求。
如果当前 BeanDefinition 的 dependsOn 属性值非空,那么就要优先加载 dependsOn 属性中指定的 Bean 了。首先,委派registerDependentBean()方法来双向记录依赖关系;然后递归调用 getBean() 方法。
public class DefaultSingletonBeanRegistry extends SimpleAliasRegistry implements SingletonBeanRegistry {
    // Map between dependent bean names: bean name to Set of dependent bean names.
    private final Map<String, Set<String>> dependentBeanMap = new ConcurrentHashMap<>(64);

    // Map between depending bean names: bean name to Set of bean names for the bean's dependencies.
    private final Map<String, Set<String>> dependenciesForBeanMap = new ConcurrentHashMap<>(64);

    public void registerDependentBean(String beanName, String dependentBeanName) {
        synchronized (this.dependentBeanMap) {
            Set<String> dependentBeans =
                    this.dependentBeanMap.computeIfAbsent(beanName, k -> new LinkedHashSet<>(8));
            if (!dependentBeans.add(dependentBeanName)) {
                return;
            }
        }

        synchronized (this.dependenciesForBeanMap) {
            Set<String> dependenciesForBean =
                    this.dependenciesForBeanMap.computeIfAbsent(dependentBeanName, k -> new LinkedHashSet<>(8));
            dependenciesForBean.add(beanName);
        }
    }
}
复制代码
§ 2.7 真正开始创建 Bean 实例
getSingleton(beanName, () -> createBean(beanName, mbd, args)) 真正拉开了 Bean 加载流程的序幕,但 属性填充 populateBean() 和 初始化 initializeBean() 这两块内容放在第三章节与第四章节中讲解。
public class DefaultSingletonBeanRegistry extends SimpleAliasRegistry implements SingletonBeanRegistry {

    // Cache of singleton objects: bean name to bean instance.
    private final Map<String, Object> singletonObjects = new ConcurrentHashMap<>(256);

    // Cache of early singleton objects: bean name to bean instance.
    private final Map<String, Object> earlySingletonObjects = new ConcurrentHashMap<>(16);

    // Cache of singleton factories: bean name to ObjectFactory.
    private final Map<String, ObjectFactory<?>> singletonFactories = new HashMap<>(16);

    // Names of beans that are currently in creation.
    private final Set<String> singletonsCurrentlyInCreation = Collections.newSetFromMap(new ConcurrentHashMap<>(16));

    // getSingleton(beanName, () -> createBean(beanName, mbd, args))
    public Object getSingleton(String beanName, ObjectFactory<?> singletonFactory) {
        synchronized (this.singletonObjects) {
            Object singletonObject = this.singletonObjects.get(beanName);
            if (singletonObject == null) {
                // 	this.singletonsCurrentlyInCreation.add(beanName)
                beforeSingletonCreation(beanName);
                boolean newSingleton = false;
                try {
                    // createBean(beanName, mbd, args))
                    singletonObject = singletonFactory.getObject();
                    newSingleton = true;
                } catch (BeanCreationException ex) {
                    throw ex;
                } finally {
                    // 	this.singletonsCurrentlyInCreation.remove(beanName)
                    afterSingletonCreation(beanName);
                }

                if (newSingleton) {
                    //	this.singletonObjects.put(beanName, singletonObject);
                    //	this.singletonFactories.remove(beanName);
                    //	this.earlySingletonObjects.remove(beanName);
                    addSingleton(beanName, singletonObject);
                }
            }

            return singletonObject;
        }
    }
}
从上述代码我们可以总结出创建 Bean 实例的核心外围逻辑。
-
首先,向 singletonsCurrentlyInCreation 成员变量中插入 beanName,标识该 Bean 正处于加载流程中。
-
其次,回调ObjectFactory的getObject()方法,getObject() 方法中的全部逻辑就是调用 createBean() 方法,createBean() 方法涵盖了完整的 Bean 加载流程。
-
再次,此时 Bean 实例不仅创建完毕,而且还完成了属性填充 populateBean() 和 初始化 initializeBean() 流程,真正具备使用的条件了,那么自然要从 singletonsCurrentlyInCreation 中删除该 beanName,标识该 Bean 加载流程走完了。
-
最后,将 Bean 实例追加到一级缓存 singletonObjects 中,同时删除二级缓存 earlySingletonObjects 和三级缓存 singletonFactories 中的内容。
接下来,终于要到 createBean() 方法中去探寻真理了。
public abstract class AbstractAutowireCapableBeanFactory extends AbstractBeanFactory
        implements AutowireCapableBeanFactory {
    /**
     * Central method of this class: creates a bean instance,
     * populates the bean instance, applies post-processors, etc.
     */
    @Override
    protected Object createBean(String beanName, RootBeanDefinition mbd, Object[] args) throws BeanCreationException {
        RootBeanDefinition mbdToUse = mbd;
        Class<?> resolvedClass = resolveBeanClass(mbd, beanName);
        if (resolvedClass != null && !mbd.hasBeanClass() && mbd.getBeanClassName() != null) {
            mbdToUse = new RootBeanDefinition(mbd);
            mbdToUse.setBeanClass(resolvedClass);
        }

        try {
            // Give BeanPostProcessors a chance to return a proxy instead of the target bean instance.
            Object bean = resolveBeforeInstantiation(beanName, mbdToUse);
            if (bean != null) {
                return bean;
            }
        } catch (Throwable ex) {
            throw new BeanCreationException(mbdToUse.getResourceDescription(), beanName,
                    "BeanPostProcessor before instantiation of bean failed", ex);
        }

        try {
            Object beanInstance = doCreateBean(beanName, mbdToUse, args);
            return beanInstance;
        } catch (BeanCreationException | ImplicitlyAppearedSingletonException ex) {
            throw ex;
        } catch (Throwable ex) {
            throw new BeanCreationException(
                    mbdToUse.getResourceDescription(), beanName, "Unexpected exception during bean creation", ex);
        }
    }
}
显然,从上述 createBean() 方法内容来看,doCreateBean()方法才有我们想要的真理!但在执行 doCreateBean() 方法前有两个知识点需要大家去关注。
-
如果当前 BeanDefinition 实例的 beanClass 属性值是字符串类型的,那么 resolveBeanClass() 方法会根据字符串类型的 beanClass 解析出一个 Class 实例,然后替换更新 beanClass 属性值。这其中涉及的关键技术是 Spring EL。
public static void main(String[] args) {
    ConfigurableApplicationContext applicationContext = SpringApplication.run(MumuApplication.class, args);
    AutowireCapableBeanFactory autowireCapableBeanFactory = applicationContext.getAutowireCapableBeanFactory();
    StandardBeanExpressionResolver beanExpressionResolver =
            new StandardBeanExpressionResolver(Thread.currentThread().getContextClassLoader());
    Object restTemplateBuilderClazz =
            beanExpressionResolver.evaluate("#{restTemplateBuilder.class}",
                    new BeanExpressionContext((ConfigurableBeanFactory) autowireCapableBeanFactory, null));
    Object restTemplateBuilderBean =
            beanExpressionResolver.evaluate("#{restTemplateBuilder}",
                    new BeanExpressionContext((ConfigurableBeanFactory) autowireCapableBeanFactory, null));
}
-
大家应该清楚 Spring AOP 是通过BeanPostProcessor将原生 Bean 实例替换为代理对象的。而 resolveBeforeInstantiation() 方法同样是利用 BeanPostProcessor 来生成代理,但这里代理生成的时机更为靠前,因为原生 Bean 实例都还没有生成呢。卧槽,这一点我还真不知道!
public abstract class AbstractAutowireCapableBeanFactory extends AbstractBeanFactory
        implements AutowireCapableBeanFactory {
    protected Object resolveBeforeInstantiation(String beanName, RootBeanDefinition mbd) {
        Object bean = null;
        if (!Boolean.FALSE.equals(mbd.beforeInstantiationResolved)) {
            if (!mbd.isSynthetic() && hasInstantiationAwareBeanPostProcessors()) {
                Class<?> targetType = determineTargetType(beanName, mbd);
                if (targetType != null) {
                    // 生成代理核心逻辑
                    bean = applyBeanPostProcessorsBeforeInstantiation(targetType, beanName);
                    if (bean != null) {
                        bean = applyBeanPostProcessorsAfterInitialization(bean, beanName);
                    }
                }
            }
            mbd.beforeInstantiationResolved = (bean != null);
        }
        return bean;
    }

    protected Object applyBeanPostProcessorsBeforeInstantiation(Class<?> beanClass, String beanName) {
        for (InstantiationAwareBeanPostProcessor bp : getBeanPostProcessorCache().instantiationAware) {
            Object result = bp.postProcessBeforeInstantiation(beanClass, beanName);
            if (result != null) {
                return result;
            }
        }
        return null;
    }
}
从
resolveBeforeInstantiation() 方法最终跟踪到了AbstractAutoProxyCreator类中,它当然是一个 BeanPostProcessor 实现类,主要内容如下。
public abstract class AbstractAutoProxyCreator extends ProxyProcessorSupport
        implements SmartInstantiationAwareBeanPostProcessor, BeanFactoryAware {
    @Override
    public Object postProcessBeforeInstantiation(Class<?> beanClass, String beanName) {
        Object cacheKey = getCacheKey(beanClass, beanName);

        if (!StringUtils.hasLength(beanName) || !this.targetSourcedBeans.contains(beanName)) {
            if (this.advisedBeans.containsKey(cacheKey)) {
                return null;
            }
            if (isInfrastructureClass(beanClass) || shouldSkip(beanClass, beanName)) {
                this.advisedBeans.put(cacheKey, Boolean.FALSE);
                return null;
            }
        }

        // Create proxy here if we have a custom TargetSource.
        TargetSource targetSource = getCustomTargetSource(beanClass, beanName);
        if (targetSource != null) {
            if (StringUtils.hasLength(beanName)) {
                this.targetSourcedBeans.add(beanName);
            }
            Object[] specificInterceptors = getAdvicesAndAdvisorsForBean(beanClass, beanName, targetSource);
            Object proxy = createProxy(beanClass, beanName, specificInterceptors, targetSource);
            this.proxyTypes.put(cacheKey, proxy.getClass());
            return proxy;
        }

        return null;
    }
}
从 AbstractAutoProxyCreator 关于代理的生成策略来看:如果基于 beanClass 可以获取到一个 TargetSource 实例,那么就将创建一个代理类。但笔者一路 DEBUG 下去,也没发现有代理类是在这里创建的,因此这里不做过多展开了,真不太懂这玩意儿呢。
好了!这两个需要大家关注的知识点讲完了,接下来就要专心攻坚 doCreateBean() 这家伙了。
public abstract class AbstractAutowireCapableBeanFactory extends AbstractBeanFactory
        implements AutowireCapableBeanFactory {

    protected Object doCreateBean(String beanName, RootBeanDefinition mbd, Object[] args) throws BeanCreationException {

        // Instantiate the bean.
        BeanWrapper instanceWrapper = createBeanInstance(beanName, mbd, args);
        Object bean = instanceWrapper.getWrappedInstance();
        Class<?> beanType = instanceWrapper.getWrappedClass();
        if (beanType != NullBean.class) {
            mbd.resolvedTargetType = beanType;
        }

        // Allow post-processors to modify the merged bean definition.
        synchronized (mbd.postProcessingLock) {
            if (!mbd.postProcessed) {
                try {
                    applyMergedBeanDefinitionPostProcessors(mbd, beanType, beanName);
                } catch (Throwable ex) {
                    throw new BeanCreationException(mbd.getResourceDescription(), beanName,
                            "Post-processing of merged bean definition failed", ex);
                }
                mbd.markAsPostProcessed();
            }
        }

        // Eagerly cache singletons to be able to resolve circular references
        // even when triggered by lifecycle interfaces like BeanFactoryAware.
        boolean earlySingletonExposure = (mbd.isSingleton() && this.allowCircularReferences &&
                isSingletonCurrentlyInCreation(beanName));
        if (earlySingletonExposure) {
            addSingletonFactory(beanName, () -> getEarlyBeanReference(beanName, mbd, bean));
        }

        // Initialize the bean instance.
        Object exposedObject = bean;
        try {
            populateBean(beanName, mbd, instanceWrapper);
            exposedObject = initializeBean(beanName, exposedObject, mbd);
        }
        catch (Throwable ex) {
            if (ex instanceof BeanCreationException bce && beanName.equals(bce.getBeanName())) {
                throw bce;
            } else {
                throw new BeanCreationException(mbd.getResourceDescription(), beanName, ex.getMessage(), ex);
            }
        }

        if (earlySingletonExposure) {
            Object earlySingletonReference = getSingleton(beanName, false);
            if (earlySingletonReference != null) {
                if (exposedObject == bean) {
                    exposedObject = earlySingletonReference;
                } else if (!this.allowRawInjectionDespiteWrapping && hasDependentBean(beanName)) {
                    String[] dependentBeans = getDependentBeans(beanName);
                    Set<String> actualDependentBeans = new LinkedHashSet<>(dependentBeans.length);
                    for (String dependentBean : dependentBeans) {
                        if (!removeSingletonIfCreatedForTypeCheckOnly(dependentBean)) {
                            actualDependentBeans.add(dependentBean);
                        }
                    }
                    if (!actualDependentBeans.isEmpty()) {
                        throw new BeanCurrentlyInCreationException(beanName,
                                "Bean with name '" + beanName + "' has been injected into other beans [" +
                                        StringUtils.collectionToCommaDelimitedString(actualDependentBeans) +
                                        "] in its raw version as part of a circular reference, but has eventually been " +
                                        "wrapped. This means that said other beans do not use the final version of the " +
                                        "bean. This is often the result of over-eager type matching - consider using " +
                                        "'getBeanNamesForType' with the 'allowEagerInit' flag turned off, for example.");
                    }
                }
            }
        }

        // Register bean as disposable.
        try {
            registerDisposableBeanIfNecessary(beanName, bean, mbd);
        } catch (BeanDefinitionValidationException ex) {
            throw new BeanCreationException(mbd.getResourceDescription(), beanName, "Invalid destruction signature", ex);
        }

        return exposedObject;
    }
}
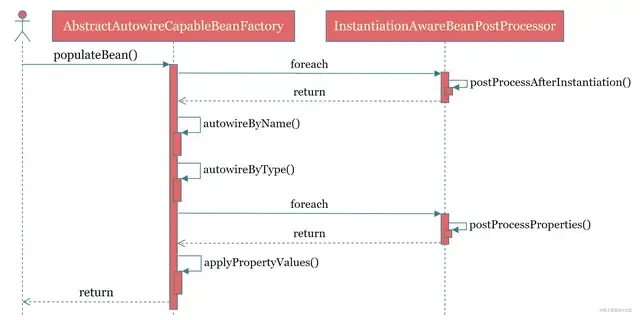
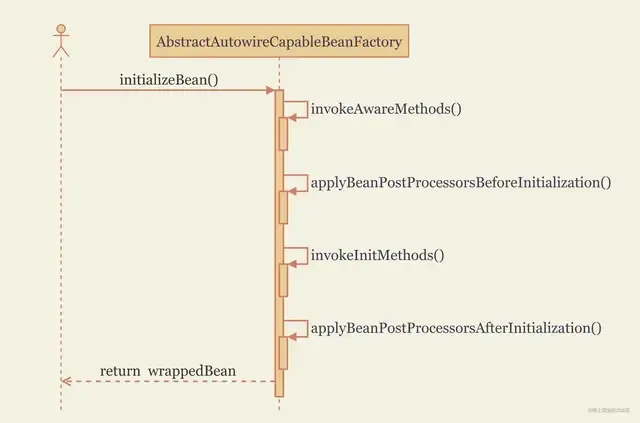
为了加深印象,这里贴一张 doCreateBean() 方法的 UML 时序图,如下所示。
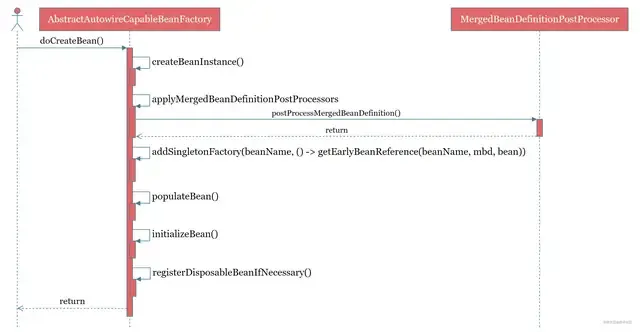
在上述 doCreateBean() 方法的源码中,我们终于看到了 createBeanInstance()、populateBean() 和 initializeBean() 的身影。刚刚说了,populateBean() 和 initializeBean() 这俩方法在后续章节分析,而笔者也不打算分析 createBeanInstance() 方法的内容,这个内容真是晦涩难懂啊,记住 “Bean 实例主要是通过反射机制来构建” 这一点就行了。
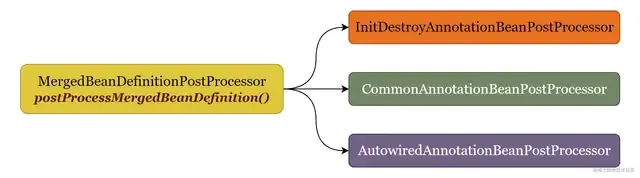
在 createBeanInstance() 方法执行完之后,紧接着执行
applyMergedBeanDefinitionPostProcessors()方法,主要是遍历MergedBeanDefinitionPostProcessor并调用其postProcessMergedBeanDefinition()方法。MergedBeanDefinitionPostProcessor 的应用时机介于 实例化 createBeanInstance() 与 属性填充 populateBean() 之间,为后续 属性填充 populateBean() 和 初始化 initializeBean() 阶段提前缓存LifecycleMetadata和InjectionMetadata。MergedBeanDefinitionPostProcessor 接口有三个重要的实现类,如下所示。
-
在 InitDestroyAnnotationBeanPostProcessor 中,其 postProcessMergedBeanDefinition() 方法负责将由 @PostConstruct、@PreDestroy 注解修饰的方法封装为 LifecycleMetadata 实例,然后将其缓存到该类的成员变量lifecycleMetadataCache中。
-
在 CommonAnnotationBeanPostProcessor 中,其 postProcessMergedBeanDefinition() 方法负责将由 @Resource 注解修饰的变量或方法封装为 InjectionMetadata 实例,然后将其缓存到该类的成员变量injectionMetadataCache中。
-
在 AutowiredAnnotationBeanPostProcessor 中,其 postProcessMergedBeanDefinition() 方法负责将由 @Autowired、@Value、@Inject 注解修饰的变量或方法封装为 InjectionMetadata 实例,然后将其缓存到该类的成员变量injectionMetadataCache中。
下面开始剖析 Spring 是如何解决循环依赖这一问题的!Spring Boot 自 2.6.0 版本开始默认不允许循环依赖,需要通过
spring.main.allow-circular-references配置项手动开启该功能。
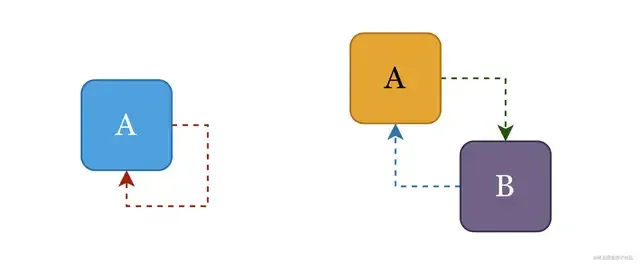
首先,要搞清楚啥是循环依赖。循环依赖就是循环引用,比如 Bean A 引用了 Bean B,而 Bean B 又引用了 Bean A,最终导致二者之间形成了一个引用环。如果引用关系是通过构造方法来搭建的,那么这种循环依赖是无解的,但如果引用关系是通过 setter 方法来搭建的,那么 Spring 是完全有能力破局的。循环依赖可以分为下图中的这两种类型,其他情形的循环依赖都是它们的变体而已。
为了解决循环依赖问题,Spring 的策略是不等 Bean 加载流程全部完成,在实例化完成之后就将 Bean 实例提前暴露出来,它是如何暴露的呢?
boolean earlySingletonExposure = (mbd.isSingleton() && this.allowCircularReferences &&
        isSingletonCurrentlyInCreation(beanName));
if (earlySingletonExposure) {
    if (logger.isTraceEnabled()) {
        logger.trace("Eagerly caching bean '" + beanName +
                "' to allow for resolving potential circular references");
    }
    addSingletonFactory(beanName, () -> getEarlyBeanReference(beanName, mbd, bean));
}
可以发现,提前暴露 Bean 实例是通过addSingletonFactory(beanName, () -> getEarlyBeanReference(beanName, mbd, bean))这一行代码实现的。
protected void addSingletonFactory(String beanName, ObjectFactory<?> singletonFactory) {
    Assert.notNull(singletonFactory, "Singleton factory must not be null");
    synchronized (this.singletonObjects) {
        if (!this.singletonObjects.containsKey(beanName)) {
            this.singletonFactories.put(beanName, singletonFactory);
            this.earlySingletonObjects.remove(beanName);
            this.registeredSingletons.add(beanName);
        }
    }
}
最终,addSingletonFactory()方法通过getEarlyBeanReference(beanName, mbd, bean)方法来将该 Bean 实例包装为一个ObjectFactory,然后丢到三级缓存 singletonFactories 中。
看到这里,相信大家肯定会有一个疑惑:明明 Bean 实例已经生成了,它就在那里,为啥还要通过 getEarlyBeanReference(beanName, mbd, bean) 方法来获取 Bean 实例呢,这不是“脱裤子放屁,多此一举”吗?
为了解答这一疑惑,我们先来看一下 getEarlyBeanReference(beanName, mbd, bean) 方法都干了啥吧。
protected Object getEarlyBeanReference(String beanName, RootBeanDefinition mbd, Object bean) {
    Object exposedObject = bean;
    if (!mbd.isSynthetic() && hasInstantiationAwareBeanPostProcessors()) {
        for (SmartInstantiationAwareBeanPostProcessor bp : getBeanPostProcessorCache().smartInstantiationAware) {
            exposedObject = bp.getEarlyBeanReference(exposedObject, beanName);
        }
    }
    return exposedObject;
}
继续跟踪到AbstractAutoProxyCreator中的 getEarlyBeanReference() 方法中。
public abstract class AbstractAutoProxyCreator extends ProxyProcessorSupport
        implements SmartInstantiationAwareBeanPostProcessor, BeanFactoryAware {
    @Override
    public Object getEarlyBeanReference(Object bean, String beanName) {
        Object cacheKey = getCacheKey(bean.getClass(), beanName);
        this.earlyProxyReferences.put(cacheKey, bean);
        return wrapIfNecessary(bean, beanName, cacheKey);
    }
}
看到wrapIfNecessary()方法就应该明白了!wrapIfNecessary() 方法负责探测是否需要为某一 Bean 创建代理,如果需要就将为其创建代理。但代理类的创建多发生于初始化阶段,这里为啥将这一动作提前了呢?当然,如果 getEarlyBeanReference(beanName, mbd, bean) 确实为某一 Bean 生成了代理类,后续初始化阶段也不会重新生成代理类,因为在 AbstractAutoProxyCreator 中有一个成员变量earlyProxyReferences可以标识这一状态。
现在,我们只需要搞清楚一个问题就行了,那就是 getEarlyBeanReference(beanName, mbd, bean) 方法为什么会如此着急地创建代理?细细想来,这么做绝对是正确的。假设 Bean A 与 Bean B 构成循环依赖关系,而且 Bean A 是需要 Spring AOP 为其生成代理的,也就是说最终驻留在 IoC 容器中的 Bean A 是一个代理。
-
尝试从多级缓存中加载 Bean A,此时肯定是加载不到的,必须要完整走一遍 Bean 加载流程了。
-
createBeanInstance() 方法为 Bean A 生成原生的 Bean 实例。
-
将 Bean A 的实例提前暴露到三级缓存 singletonObjects 中,此时由于需要为 Bean A 生成代理,那么最终躺在三级缓存 singletonObjects 中的是其代理。
-
populateBean() 方法为 Bean A 进行属性填充,这时发现需要为 Bean A 注入 Bean B。
-
尝试从多级缓存中加载 Bean B,此时肯定是加载不到的,必须要完整走一遍 Bean 加载流程了。
-
createBeanInstance() 方法为 Bean B 生成 Bean 实例。
-
将 Bean B 的实例提前暴露到三级缓存 singletonObjects 中。
-
populateBean() 方法为 Bean B 进行属性填充,这时发现需要为 Bean B 注入 Bean A,自然会触发对 Bean A 的加载流程。
-
这个时候已经可以从多级缓存中加载到 Bean A 了,因为它此刻正躺在三级缓存 singletonObjects 中呢。
-
populateBean() 方法会触发 getBean(Bean A) 的加载流程,既然直接从多级缓存中拿到了 Bean A,接下来,自然是继续为 Bean B 注入 Bean A 了。
想象一下,如果 getEarlyBeanReference(beanName, mbd, bean) 方法没有将创建代理的动作提前,那么此时此刻注入到 Bean B 中的 Bean A 只是其原生的实例,而不再是代理!
最后,再看一个关于多级缓存与循环依赖的知识点,内容如下所示,依然是 doCreateBean() 方法中的内容。
Object exposedObject = bean;
try {
    populateBean(beanName, mbd, instanceWrapper);
    exposedObject = initializeBean(beanName, exposedObject, mbd);
} catch (Throwable ex) {
    throw new BeanCreationException(mbd.getResourceDescription(), beanName, ex.getMessage(), ex);
}

if (earlySingletonExposure) {
    Object earlySingletonReference = getSingleton(beanName, false);
    if (earlySingletonReference != null) {
        if (exposedObject == bean) {
            exposedObject = earlySingletonReference;
        } else if (!this.allowRawInjectionDespiteWrapping && hasDependentBean(beanName)) {
            String[] dependentBeans = getDependentBeans(beanName);
            Set<String> actualDependentBeans = new LinkedHashSet<>(dependentBeans.length);
            for (String dependentBean : dependentBeans) {
                if (!removeSingletonIfCreatedForTypeCheckOnly(dependentBean)) {
                    actualDependentBeans.add(dependentBean);
                }
            }
            if (!actualDependentBeans.isEmpty()) {
                throw new BeanCurrentlyInCreationException(beanName,
                        "Bean with name '" + beanName + "' has been injected into other beans [" +
                                StringUtils.collectionToCommaDelimitedString(actualDependentBeans) +
                                "] in its raw version as part of a circular reference, but has eventually been " +
                                "wrapped. This means that said other beans do not use the final version of the " +
                                "bean. This is often the result of over-eager type matching - consider using " +
                                "'getBeanNamesForType' with the 'allowEagerInit' flag turned off, for example.");
            }
        }
    }
}
笔者在看完上述内容后,也是思考了许久才搞明白。主要不理解actualDependentBeans非空的话,为啥就需要抛出异常。后来结合那一长坨异常信息才顿悟了,有点无语,哈哈。首先,通过 getSingleton(beanName, false)方法从多级缓存中加载 Bean,注意传入的 allowEarlyReference 参数值为 false,也就是说只会尝试从一级缓存 singletonObjects 和 二级缓存 earlySingletonObjects 中加载 Bean 了。
如果 getSingleton(beanName, false) 方法加载到的 Bean 是来自于二级缓存 earlySingletonObjects 的,那说明什么问题?记住:一旦某一 Bean 的早期实例从三级缓存 singletonFactories 转移到了二级缓存 earlySingletonObjects 中,那么该 Bean 一定是与另一个 Bean 构成了循环依赖,而且转移的时机就是另一个与其循环依赖的 Bean 将其作为依赖注入进去了;换句话说,在循环依赖场景下,二级缓存 earlySingletonObjects 是用来标识某一早期 Bean 实例是否被别人拿去注入了。
有了这些知识的铺垫,理解上述内容就容易很多了。如果 getSingleton(beanName, false) 方法返回的 earlySingletonReference 非空且 earlySingletonReference 与 exposedObject 不一致,那说明 initializeBean() 方法生成了代理 Bean,而此时 earlySingletonReference 这个早前 Bean 实例已经被其他 Bean 使用 (注入) 了,这时 actualDependentBeans 肯定是非空的,当然要抛出异常了!
§ 2.8 转换 Bean 实例为特定类型
Bean 的加载流程已经接近尾声了,还有最后一个步骤,就是对 Bean 进行类型转换。大多数情况下,adaptBeanInstance() 方法中 requiredType 这一参数值是空的,也就是毛都不做;但如果 requiredType 非空,那就需要将 Bean 实例转换为特定的类型。
public abstract class AbstractBeanFactory {
    public <T> T adaptBeanInstance(String name, Object bean, Class<?> requiredType) {
        if (requiredType != null && !requiredType.isInstance(bean)) {
            try {
                Object convertedBean = getTypeConverter().convertIfNecessary(bean, requiredType);
                if (convertedBean == null) {
                    throw new BeanNotOfRequiredTypeException(name, requiredType, bean.getClass());
                }
                return (T) convertedBean;
            } catch (TypeMismatchException ex) {
                throw new BeanNotOfRequiredTypeException(name, requiredType, bean.getClass());
            }
        }

        return (T) bean;
    }
}
实例化的逻辑难就难在循环依赖这一块,除此之外也没啥别的干货了,Bean 加载流程中的干货基本都是在属性填充与初始化这俩环节。
3 属性填充
关于属性填充或者属性注入的概念,大家或多或少都了解一些,下面就一起来看看它的全部逻辑吧。
public abstract class AbstractAutowireCapableBeanFactory extends AbstractBeanFactory
        implements AutowireCapableBeanFactory {
    /**
     * Populate the bean instance in the given BeanWrapper with the property values
     * from the bean definition.
     */
    protected void populateBean(String beanName, RootBeanDefinition mbd, BeanWrapper bw) {
        // § 3.1
        if (!mbd.isSynthetic() && hasInstantiationAwareBeanPostProcessors()) {
            for (InstantiationAwareBeanPostProcessor bp : getBeanPostProcessorCache().instantiationAware) {
                if (!bp.postProcessAfterInstantiation(bw.getWrappedInstance(), beanName)) {
                    return;
                }
            }
        }


        PropertyValues pvs = (mbd.hasPropertyValues() ? mbd.getPropertyValues() : null);
        int resolvedAutowireMode = mbd.getResolvedAutowireMode();
        if (resolvedAutowireMode == AUTOWIRE_BY_NAME || resolvedAutowireMode == AUTOWIRE_BY_TYPE) {
            MutablePropertyValues newPvs = new MutablePropertyValues(pvs);
            // Add property values based on autowire by name if applicable.
            if (resolvedAutowireMode == AUTOWIRE_BY_NAME) {
                // § 3.2
                autowireByName(beanName, mbd, bw, newPvs);
            }
            // Add property values based on autowire by type if applicable.
            if (resolvedAutowireMode == AUTOWIRE_BY_TYPE) {
                // § 3.3
                autowireByType(beanName, mbd, bw, newPvs);
            }
            pvs = newPvs;
        }

        // § 3.4
        if (hasInstantiationAwareBeanPostProcessors()) {
            if (pvs == null) {
                pvs = mbd.getPropertyValues();
            }
            for (InstantiationAwareBeanPostProcessor bp : getBeanPostProcessorCache().instantiationAware) {
                PropertyValues pvsToUse = bp.postProcessProperties(pvs, bw.getWrappedInstance(), beanName);
                if (pvsToUse == null) {
                    return;
                }
                pvs = pvsToUse;
            }
        }

        // § 3.5
        if (pvs != null) {
            applyPropertyValues(beanName, mbd, bw, pvs);
        }
    }
}
§ 3.1 postProcessAfterInstantiation()
Spring 针对 Bean 实例化之后、属性填充之前的这一阶段,通过
InstantiationAwareBeanPostProcessor的postProcessAfterInstantiation()方法提供了一个拓展点,postProcessAfterInstantiation() 方法返回 false,那么后续将不再进行属性填充操作。目前,笔者还没有发现哪里使用到了这一拓展点,大家了解即可。
public interface InstantiationAwareBeanPostProcessor extends BeanPostProcessor {
    /**
     * Perform operations after the bean has been instantiated, via a constructor or factory method,
     * but before Spring property population (from explicit properties or autowiring) occurs.
     * <p>The default implementation returns {@code true}.
     * @param bean the bean instance created, with properties not having been set yet
     * @param beanName the name of the bean
     * @return {@code true} if properties should be set on the bean; {@code false}
     * if property population should be skipped. Normal implementations should return {@code true}.
     */
    default boolean postProcessAfterInstantiation(Object bean, String beanName) throws BeansException {
        return true;
    }
}
§ 3.2 autowireByName()
public abstract class AbstractAutowireCapableBeanFactory extends AbstractBeanFactory
        implements AutowireCapableBeanFactory {
    protected void autowireByName(
            String beanName, AbstractBeanDefinition mbd, BeanWrapper bw, MutablePropertyValues pvs) {
        String[] propertyNames = unsatisfiedNonSimpleProperties(mbd, bw);
        for (String propertyName : propertyNames) {
            // 	public boolean containsBean(String name) {
            //		String beanName = transformedBeanName(name);
            //		if (containsSingleton(beanName) || containsBeanDefinition(beanName)) {
            //			return (!BeanFactoryUtils.isFactoryDereference(name) || isFactoryBean(name));
            //		}
            //		return false
            //	}
            //  -------------------------------------------------------------------------
            // 	public boolean containsSingleton(String beanName) {
            //		return this.singletonObjects.containsKey(beanName);
            //	}
            //  -------------------------------------------------------------------------
            // 	public boolean containsBeanDefinition(String beanName) {
            //		Assert.notNull(beanName, "Bean name must not be null");
            //		return this.beanDefinitionMap.containsKey(beanName);
            //	}
            if (containsBean(propertyName)) {
                Object bean = getBean(propertyName);
                pvs.add(propertyName, bean);
                registerDependentBean(propertyName, beanName);
            }
        }
    }

    protected String[] unsatisfiedNonSimpleProperties(AbstractBeanDefinition mbd, BeanWrapper bw) {
        Set<String> result = new TreeSet<>();
        PropertyValues pvs = mbd.getPropertyValues();
        PropertyDescriptor[] pds = bw.getPropertyDescriptors();
        for (PropertyDescriptor pd : pds) {
            if (pd.getWriteMethod() != null && !pvs.contains(pd.getName()) &&
                    !BeanUtils.isSimpleProperty(pd.getPropertyType())) {
                result.add(pd.getName());
            }
        }
        return StringUtils.toStringArray(result);
    }
}
每个 RootBeanDefinition 实例持有一MutablePropertyValues类型的成员变量,该成员变量持有若干个PropertyValue实例,而一个 PropertyValue 实例则代表着一对 key/value 键值对儿。autowireByName()方法的核心逻辑就是向当前 RootBeanDefinition 实例所持有的 MutablePropertyValues 变量内插入一个或多个 PropertyValue 实例,此时 PropertyValue 实例的 key 是当前 Bean 实例中某一成员变量名,value 则是 IoC 容器中一个以 key 为 beanName 的 Bean 实例,如果该 Bean 尚未加载,那么此时会进行 Bean 加载。
一个 Bean 实例中会有多个成员变量,那么究竟哪些成员变量才有资格被封装成一个 PropertyValue 实例、最终进入到 MutablePropertyValues 中呢?
-
首先,在一级缓存 singletonObjects 与 beanDefinitionMap 二者中至少有一个能匹配到该 beanName。
-
其次,该成员变量必须要有相应的 setter 方法;由 @Autowired 或 @Resource 注解标注的成员变量一般是过不了这一关的,因为咱们平时很少为它们编写 setter 方法。
-
再次,该成员变量名称在当前 RootBeanDefinition 实例所持有的成员变量 MutablePropertyValues 中必须是不存在。
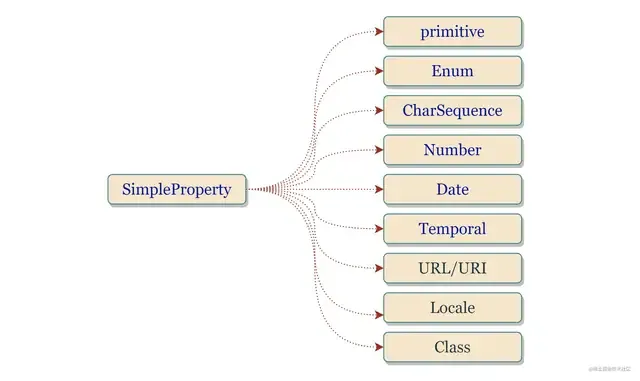
-
最后,该成员变量的类型不能是一种Simple Property,具体参考下图。
§ 3.3 autowireByType()
autowireByType() 方法与 autowireByName() 方法的核心逻辑是一致的,首先将当前 Bean 实例中符合条件的成员变量封装为一个 PropertyValue 实例,然后把这些 PropertyValue 实例塞进相应 RootBeanDefinition 实例的成员变量 MutablePropertyValues 中去。但相较于 autowireByName() 方法,autowireByType() 方法内容却复杂得多,这是为什么呢?在上一小节中曾提到:PropertyValue 实例所持有的 value 是一个已完成加载流程的 Bean 实例。在 byName 场景下,这么说是没问题的,因为在 IoC 容器中 beanName 与 Bean 实例是一一对应的;但在 byType 场景下可就不一定了,因为在 IoC 容器中 beanType 与 Bean 实例可以是一对多的关系!
public abstract class AbstractAutowireCapableBeanFactory extends AbstractBeanFactory implements AutowireCapableBeanFactory {
    protected void autowireByType(String beanName, AbstractBeanDefinition mbd, BeanWrapper bw, MutablePropertyValues pvs) {
        TypeConverter converter = getCustomTypeConverter();
        if (converter == null) {
            converter = bw;
        }
        Set<String> autowiredBeanNames = new LinkedHashSet<>(4);
        String[] propertyNames = unsatisfiedNonSimpleProperties(mbd, bw);
        for (String propertyName : propertyNames) {
            try {
                PropertyDescriptor pd = bw.getPropertyDescriptor(propertyName);
                if (Object.class != pd.getPropertyType()) {
                    MethodParameter methodParam = BeanUtils.getWriteMethodParameter(pd);
                    boolean eager = !(bw.getWrappedInstance() instanceof PriorityOrdered);
                    DependencyDescriptor desc = new AutowireByTypeDependencyDescriptor(methodParam, eager);
                    // 核心逻辑
                    Object autowiredArgument = resolveDependency(desc, beanName, autowiredBeanNames, converter);
                    if (autowiredArgument != null) {
                        // 最终目的
                        pvs.add(propertyName, autowiredArgument);
                    }
                    for (String autowiredBeanName : autowiredBeanNames) {
                        registerDependentBean(autowiredBeanName, beanName);
                    }
                    autowiredBeanNames.clear();
                }
            } catch (BeansException ex) {
                throw new UnsatisfiedDependencyException(mbd.getResourceDescription(), beanName, propertyName, ex);
            }
        }
    }
}
大家应该可以很自然地想到resolveDependency()方法所解析出的结果可能是一个已完成加载流程的 Bean 实例,也可能是一个 Array、Collection或者Map类型、包含多个同一 beanType 且已完成加载流程的 Bean 实例。为什么这么肯定 Bean 实例一定是已完成加载流程的呢?因为 resolveDependency() 方法内部最终也是委派 AbstractBeanFactory 的 getBean(beanName) 方法来拿到想要的单例 Bean。
resolveDependency()方法绝对是重中之重,但源码太长了,一层套一层的,这里仅贴出它所极度依赖的findAutowireCandidates()方法吧。
public class DefaultListableBeanFactory extends AbstractAutowireCapableBeanFactory
        implements ConfigurableListableBeanFactory, BeanDefinitionRegistry, Serializable {
    /**
     * Find bean instances that match the required type.
     * Called during autowiring for the specified bean.
     */
    protected Map<String, Object> findAutowireCandidates(@Nullable String beanName, Class<?> requiredType, DependencyDescriptor descriptor) {
        // 核心逻辑
        String[] candidateNames = BeanFactoryUtils.beanNamesForTypeIncludingAncestors(
                this, requiredType, true, descriptor.isEager());
        Map<String, Object> result = CollectionUtils.newLinkedHashMap(candidateNames.length);
        for (String candidate : candidateNames) {
            if (!isSelfReference(beanName, candidate) && isAutowireCandidate(candidate, descriptor)) {
                // 核心逻辑
                addCandidateEntry(result, candidate, descriptor, requiredType);
            }
        }
        return result;
    }

    private void addCandidateEntry(Map<String, Object> candidates, String candidateName,
                                   DependencyDescriptor descriptor, Class<?> requiredType) {
        if (descriptor instanceof MultiElementDescriptor) {
            Object beanInstance = descriptor.resolveCandidate(candidateName, requiredType, this);
            if (!(beanInstance instanceof NullBean)) {
                candidates.put(candidateName, beanInstance);
            }
        } else if (containsSingleton(candidateName) || (descriptor instanceof StreamDependencyDescriptor streamDescriptor && streamDescriptor.isOrdered())) {
            Object beanInstance = descriptor.resolveCandidate(candidateName, requiredType, this);
            candidates.put(candidateName, (beanInstance instanceof NullBean ? null : beanInstance));
        } else {
            candidates.put(candidateName, getType(candidateName));
        }
    }
}

public class DependencyDescriptor extends InjectionPoint implements Serializable {
    public Object resolveCandidate(String beanName, Class<?> requiredType, BeanFactory beanFactory)
            throws BeansException {
        return beanFactory.getBean(beanName);
    }
}
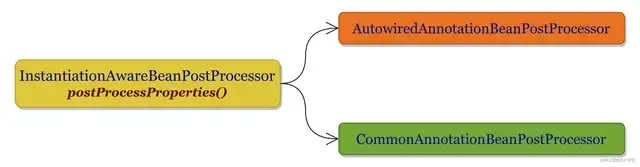
§ 3.4 postProcessProperties()
postProcessProperties()方法由
InstantiationAwareBeanPostProcessor接口声明,是一种面向注解的依赖注入拓展点。Spring 为其提供了两个极其重要的实现类,如下图所示。
3.4.1 CommonAnnotationBeanPostProcessor
在
CommonAnnotationBeanPostProcessor中,postProcessProperties() 方法负责为 Bean 实例内由@Resource注解标识的成员变量注入依赖。
public class CommonAnnotationBeanPostProcessor extends InitDestroyAnnotationBeanPostProcessor
        implements InstantiationAwareBeanPostProcessor, BeanFactoryAware, Serializable {
    @Override
    public PropertyValues postProcessProperties(PropertyValues pvs, Object bean, String beanName) {
        InjectionMetadata metadata = findResourceMetadata(beanName, bean.getClass(), pvs);
        try {
            metadata.inject(bean, beanName, pvs);
        } catch (Throwable ex) {
            throw new BeanCreationException(beanName, "Injection of resource dependencies failed", ex);
        }
        return pvs;
    }
}
public class InjectionMetadata {
    public void inject(Object target, String beanName,PropertyValues pvs) throws Throwable {
        Collection<InjectedElement> checkedElements = this.checkedElements;
        Collection<InjectedElement> elementsToIterate =
                (checkedElements != null ? checkedElements : this.injectedElements);
        if (!elementsToIterate.isEmpty()) {
            for (InjectedElement element : elementsToIterate) {
                element.inject(target, beanName, pvs);
            }
        }
    }

    protected void inject(Object target, @Nullable String requestingBeanName, @Nullable PropertyValues pvs)
            throws Throwable {
        if (this.isField) {
            Field field = (Field) this.member;
            ReflectionUtils.makeAccessible(field);
            field.set(target, getResourceToInject(target, requestingBeanName));
        } else {
            try {
                Method method = (Method) this.member;
                ReflectionUtils.makeAccessible(method);
                method.invoke(target, getResourceToInject(target, requestingBeanName));
            } catch (InvocationTargetException ex) {
                throw ex.getTargetException();
            }
        }
    }
}
从InjectionMetadata源码内容可以明显看出最终是通过反射机制来实现依赖注入的!
3.4.2 AutowiredAnnotationBeanPostProcessor
在
AutowiredAnnotationBeanPostProcessor中,postProcessProperties() 方法负责为 Bean 实例内由@Autowired、@Value和@Inject注解标识的成员变量注入依赖。
public class AutowiredAnnotationBeanPostProcessor implements SmartInstantiationAwareBeanPostProcessor,
        MergedBeanDefinitionPostProcessor, BeanRegistrationAotProcessor, PriorityOrdered, BeanFactoryAware {
    @Override
    public PropertyValues postProcessProperties(PropertyValues pvs, Object bean, String beanName) {
        InjectionMetadata metadata = findAutowiringMetadata(beanName, bean.getClass(), pvs);
        try {
            metadata.inject(bean, beanName, pvs);
        } catch (BeanCreationException ex) {
            throw ex;
        } catch (Throwable ex) {
            throw new BeanCreationException(beanName, "Injection of autowired dependencies failed", ex);
        }
        return pvs;
    }
}
从上面源码内容来看,
CommonAnnotationBeanPostProcessor 与 AutowiredAnnotationBeanPostProcessor 最终都是以 InjectionMetadata 进行依赖注入,但各自findAutowiringMetadata()方法中的逻辑是不一样的,因为面向的是不同类型的注解。此外,有必要提一下@Value注解的解析逻辑,解析入口位于ConfigurableBeanFactory接口中的resolveEmbeddedValue()方法,其内部会委派StringValueResolver去解析,PlaceholderResolvingStringValueResolver是 StringValueResolver 接口一个比较重要的实现类,@Value注解的解析逻辑最终就在该实现类中!
§ 3.5 applyPropertyValues()
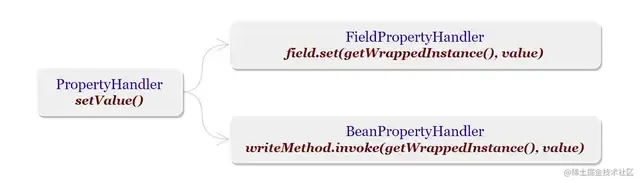
程序运行到这里,当前 Bean 实例内由@Resource、@Autowired、@Value和@Inject注解标识的成员变量已经全部完成了依赖注入,但当前 RootBeanDefinition 实例内 MutablePropertyValues 类型的成员变量中还有若干 PropertyValue 实例没有被当成依赖而注入到当前 Bean 实例中去,这些 PropertyValue 实例主要是由autowireByName()和autowireByType()方法塞进来的,当然也可以由开发人员自定义的BeanFactoryPostProcessor实现类来置入。
最终也是通过反射机制为当前 Bean 实例实现依赖注入的,如下图所示。
4 初始化
谢天谢地!我们终于来到了较为轻松的初始化阶段。对@PostConstruct、InitializingBean和Custom Init Method这三种初始化方法的调用绝不仅仅是初始化阶段的全部,事实上还有更为重要的知识点值得我们去关注。
public abstract class AbstractAutowireCapableBeanFactory extends AbstractBeanFactory implements AutowireCapableBeanFactory {
    /**
     * Initialize the given bean instance, applying factory callbacks
     * as well as init methods and bean post processors.
     */
    protected Object initializeBean(String beanName, Object bean, RootBeanDefinition mbd) {
        // § 4.1
        invokeAwareMethods(beanName, bean);

        // § 4.2
        Object wrappedBean = bean;
        if (mbd == null || !mbd.isSynthetic()) {
            wrappedBean = applyBeanPostProcessorsBeforeInitialization(wrappedBean, beanName);
        }

        // § 4.3
        try {
            invokeInitMethods(beanName, wrappedBean, mbd);
        } catch (Throwable ex) {
            throw new BeanCreationException(
                    (mbd != null ? mbd.getResourceDescription() : null), beanName, ex.getMessage(), ex);
        }

        // § 4.4
        if (mbd == null || !mbd.isSynthetic()) {
            wrappedBean = applyBeanPostProcessorsAfterInitialization(wrappedBean, beanName);
        }

        return wrappedBean;
    }
}
从上述源码内容来看,针对 Bean 的初始化逻辑由四部分组成。下面对这四部分内容进行逐一击破!
§ 4.1 invokeAwareMethods()
invokeAwareMethods() 方法简单得已经没啥好说的了,直接贴代码就完事了。
private void invokeAwareMethods(String beanName, Object bean) {
    if (bean instanceof Aware) {
        if (bean instanceof BeanNameAware beanNameAware) {
            beanNameAware.setBeanName(beanName);
        }
        if (bean instanceof BeanClassLoaderAware beanClassLoaderAware) {
            ClassLoader bcl = getBeanClassLoader();
            if (bcl != null) {
                beanClassLoaderAware.setBeanClassLoader(bcl);
            }
        }
        if (bean instanceof BeanFactoryAware beanFactoryAware) {
            beanFactoryAware.setBeanFactory(AbstractAutowireCapableBeanFactory.this);
        }
    }
}
§ 4.2 applyBeanPostProcessorsBeforeInitialization()
public Object applyBeanPostProcessorsBeforeInitialization(Object existingBean, String beanName) throws BeansException {
    Object result = existingBean;
    for (BeanPostProcessor processor : getBeanPostProcessors()) {
        Object current = processor.postProcessBeforeInitialization(result, beanName);
        if (current == null) {
            return result;
        }
        result = current;
    }
    return result;
}
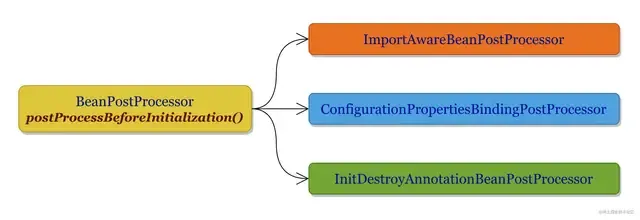
从上述源码内容来看,
applyBeanPostProcessorsBeforeInitialization()方法主要就是遍历 BeanPostProcessor 并调用其 postProcessBeforeInitialization() 方法。 那么究竟有哪些 BeanPostProcessor 实现类恰好实现了 postProcessBeforeInitialization() 方法呢? 比较重要的有三个,如下所示。
下面以两个小节分别对
ConfigurationPropertiesBindingPostProcessor 与 InitDestroyAnnotationBeanPostProcessor 进行剖析。
4.2.1 ConfigurationPropertiesBindingPostProcessor
大家也许知道,一个外部配置源与一个PropertySource是一一对应的,一个 PropertySource 实例中可以有多个配置项;但在 Spring 的地盘,还是要入乡随俗,这些 PropertySource 均会被追加到Environment中 ! 而本小节的主角
ConfigurationPropertiesBindingPostProcessor可以将外部配置源中的配置项绑定到由@ConfigurationProperties注解标注的 Bean 实例中,当然真正实现配置绑定的是 Spring Boot 自己提供的Binder API。
Binder API 中有四个核心类。Binder会进行真正地绑定操作,其提供多个绑定动作方法,如:bind()、bindObject() 和 bindOrCreate() 等方法;Bindable代表可绑定的目标,其支持泛型;BindResult代表绑定过后的结果,有点类似Optional;BindHandler用于在绑定过程中插入一些额外的逻辑,它提供了五个方法:onStart()、onSuccess()、onCreate()、onFailure() 和 onFinish()。
下面通过一段代码来演示一下 Binder API 的魅力。
@Data
public class PersonProperties {
    private String firstName;
    private int age;
}

@SpringBootApplication
public class MumuApplication {
    public static void main(String[] args) {
        /*
         *        application.properties
         * =====================================
         * external-config.person.first-name=duxiaotou
         * external-config.person.age=18
         */
        ConfigurableApplicationContext wac = SpringApplication.run(MumuApplication.class, args);
        ConfigurableEnvironment environment = wac.getEnvironment();
        Binder binder = Binder.get(environment);
        Bindable<PersonProperties> bindableTarget = Bindable.of(PersonProperties.class);
        BindResult<PersonProperties> bindResult = binder.bind(ConfigurationPropertyName.of("external-config.person"), bindableTarget);
        PersonProperties personProperties = bindResult.get();
    }
}
这里想问大家一个问题:如果将 application.properties 配置文件中的配置项修改为
external-config.person.FIRSTNAME、
external-config.person.first_name 和
external-config.person.firstName ,那么还能正常绑定吗?答案是肯定的,这正是由 Spring Boot 提出的relaxed binding概念!
下面咱们再来看一看
ConfigurationPropertiesBindingPostProcessor 中 postProcessBeforeInitialization() 方法的内容。
public class ConfigurationPropertiesBindingPostProcessor
        implements BeanPostProcessor, PriorityOrdered, ApplicationContextAware, InitializingBean {

    private ApplicationContext applicationContext;

    private ConfigurationPropertiesBinder binder;

    @Override
    public void setApplicationContext(ApplicationContext applicationContext) throws BeansException {
        this.applicationContext = applicationContext;
    }

    @Override
    public void afterPropertiesSet() {
        this.binder = ConfigurationPropertiesBinder.get(this.applicationContext);
    }

    @Override
    public Object postProcessBeforeInitialization(Object bean, String beanName) throws BeansException {
        bind(ConfigurationPropertiesBean.get(this.applicationContext, bean, beanName));
        return bean;
    }

    private void bind(ConfigurationPropertiesBean bean) {
        if (bean == null || hasBoundValueObject(bean.getName())) {
            return;
        }
        try {
            this.binder.bind(bean);
        } catch (Exception ex) {
            throw new ConfigurationPropertiesBindException(bean, ex);
        }
    }
}
继续跟进到
ConfigurationPropertiesBinder中一探究竟。
public class ConfigurationPropertiesBinder {

    private final ApplicationContext applicationContext;

    private final PropertySources propertySources;

    private volatile Binder binder;

    public ConfigurationPropertiesBinder(ApplicationContext applicationContext) {
        this.applicationContext = applicationContext;
        this.propertySources = new PropertySourcesDeducer(applicationContext).getPropertySources();
        this.configurationPropertiesValidator = getConfigurationPropertiesValidator(applicationContext);
        this.jsr303Present = ConfigurationPropertiesJsr303Validator.isJsr303Present(applicationContext);
    }

    public BindResult<?> bind(ConfigurationPropertiesBean propertiesBean) {
        Bindable<?> target = propertiesBean.asBindTarget();
        ConfigurationProperties annotation = propertiesBean.getAnnotation();
        BindHandler bindHandler = getBindHandler(target, annotation);
        return getBinder().bind(annotation.prefix(), target, bindHandler);
    }
}
上述源码内容明确地告诉我们:
ConfigurationPropertiesBinder 正是通过 Binder API 来实现配置项绑定的。
熟悉 Environment 的读者肯定知道,Environment 中包含多个不同名称的 PropertySource,比如:command line args、servlet config init params、servlet context init params、system properties、system environment 和 annotation-{profile}.properties 等。但这些 PropertySource 是不具备relaxed binding能力的,那么 Sping Boot 又是如何为这一众 PropertySource 插上relaxed binding翅膀的呢?原来,Spring Boot 会提早插入一个名为configurationProperties的 PropertySourc,而且这个 PropertySource 位于 MutablePropertySources 最顶端。如下所示。
public final class ConfigurationPropertySources {

    private static final String ATTACHED_PROPERTY_SOURCE_NAME = "configurationProperties";

    public static void attach(Environment environment) {
        MutablePropertySources sources = ((ConfigurableEnvironment) environment).getPropertySources();
        PropertySource<?> attached =
                new ConfigurationPropertySourcesPropertySource(ATTACHED_PROPERTY_SOURCE_NAME, new SpringConfigurationPropertySources(sources));
        sources.addFirst(attached);
    }
}
上述 attach() 方法内容表明,这些不具备 relaxed binding 能力的 PropertySource 全部被丢进了
SpringConfigurationPropertySources中,它的主要内容如下。
public class SpringConfigurationPropertySources implements Iterable<ConfigurationPropertySource> {

    private final Iterable<PropertySource<?>> sources;

    private final Map<PropertySource<?>, ConfigurationPropertySource> cache =
            new ConcurrentReferenceHashMap<>(16, ConcurrentReferenceHashMap.ReferenceType.SOFT);

    public SpringConfigurationPropertySources(Iterable<PropertySource<?>> sources) {
        this.sources = sources;
    }

    @Override
    public Iterator<ConfigurationPropertySource> iterator() {
        return new SourcesIterator(this.sources.iterator(), this::adapt);
    }

    private ConfigurationPropertySource adapt(PropertySource<?> source) {
        ConfigurationPropertySource result = this.cache.get(source);
        if (result != null) {
            return result;
        }
        result = SpringConfigurationPropertySource.from(source);
        if (source instanceof OriginLookup) {
            result = result.withPrefix(((OriginLookup<?>) source).getPrefix());
        }
        this.cache.put(source, result);
        return result;
    }
}

public class SpringConfigurationPropertySource implements ConfigurationPropertySource {
    public static SpringConfigurationPropertySource from(PropertySource<?> source) {
        Assert.notNull(source, "Source must not be null");
        PropertyMapper[] mappers = getPropertyMappers(source);
        if (isFullEnumerable(source)) {
            return new SpringIterableConfigurationPropertySource((EnumerablePropertySource<?>) source, mappers);
        }
        return new SpringConfigurationPropertySource(source, mappers);
    }
}
从
SpringConfigurationPropertySources 源码内容来看,在对塞进来的 PropertySource 进行遍历的时候,会涉及适配操作。无非就是将一个个不具备 relaxed binding 能力的 PropertySource 适配成 SpringConfigurationPropertySource或者SpringIterableConfigurationPropertySource。SpringIterableConfigurationPropertySource 继承自 SpringConfigurationPropertySource,这哥俩恰恰具备完整的 relaxed binding 能力!最后一个问题,谁会来调用 SpringConfigurationPropertySources 的 iterator() 方法呢?当然是 Binder 在进行配置项绑定的时候,会通过其findProperty方法触发遍历动作。
public class Binder {
    private <T> ConfigurationProperty findProperty(ConfigurationPropertyName name,
                                                   Bindable<T> target,
                                                   Binder.Context context) {
        if (name.isEmpty() || target.hasBindRestriction(Bindable.BindRestriction.NO_DIRECT_PROPERTY)) {
            return null;
        }
        // context.getSources()
        //  ==> SpringConfigurationPropertySources#iterator()
        //   ==> SpringConfigurationPropertySources#adapt
        for (ConfigurationPropertySource source : context.getSources()) {
            ConfigurationProperty property = source.getConfigurationProperty(name);
            if (property != null) {
                return property;
            }
        }
        return null;
    }
}
4.2.2 InitDestroyAnnotationBeanPostProcessor
InitDestroyAnnotationBeanPostProcessor主要用于调用当前 Bean 实例中由@PostConstruct以及@PreDestroy注解修饰的方法。 在其 postProcessBeforeInitialization() 方法内,首先通过 findLifecycleMetadata() 方法找到LifecycleMetadata实例,LifecycleMetadata 实例封装了@PostConstruct以及@PreDestroy注解修饰的方法,同时这个 LifecycleMetadata 实例会被缓存到Map<Class<?>, LifecycleMetadata>类型的成员变量 lifecycleMetadataCache 中,然后调用该 LifecycleMetadata 实例的 invokeInitMethods() 方法。 详细内容如下所示。
public class InitDestroyAnnotationBeanPostProcessor implements MergedBeanDefinitionPostProcessor, DestructionAwareBeanPostProcessor {
    /**
     * jakarta.annotation.PostConstruct
     */
    private Class<? extends Annotation> initAnnotationType;
    /**
     * jakarta.annotation.PreDestroy
     */
    private Class<? extends Annotation> destroyAnnotationType;

    private final transient Map<Class<?>, LifecycleMetadata> lifecycleMetadataCache = new ConcurrentHashMap<>(256);

    @Override
    public Object postProcessBeforeInitialization(Object bean, String beanName) throws BeansException {
        LifecycleMetadata metadata = findLifecycleMetadata(bean.getClass());
        try {
            metadata.invokeInitMethods(bean, beanName);
        } catch (InvocationTargetException ex) {
            throw new BeanCreationException(beanName, "Invocation of init method failed", ex.getTargetException());
        } catch (Throwable ex) {
            throw new BeanCreationException(beanName, "Failed to invoke init method", ex);
        }
        return bean;
    }

    @Override
    public void postProcessBeforeDestruction(Object bean, String beanName) throws BeansException {
        LifecycleMetadata metadata = findLifecycleMetadata(bean.getClass());
        try {
            metadata.invokeDestroyMethods(bean, beanName);
        } catch (InvocationTargetException ex) {
            logger.warn("Destroy method on bean with name '" + beanName + "' threw an exception" + ": " + ex.getTargetException());
        } catch (Throwable ex) {
            logger.warn("Failed to invoke destroy method on bean with name '" + beanName + "'", ex);
        }
    }

    private LifecycleMetadata findLifecycleMetadata(Class<?> clazz) {
        if (this.lifecycleMetadataCache == null) {
            return buildLifecycleMetadata(clazz);
        }
        LifecycleMetadata metadata = this.lifecycleMetadataCache.get(clazz);
        if (metadata == null) {
            synchronized (this.lifecycleMetadataCache) {
                metadata = this.lifecycleMetadataCache.get(clazz);
                if (metadata == null) {
                    metadata = buildLifecycleMetadata(clazz);
                    this.lifecycleMetadataCache.put(clazz, metadata);
                }
                return metadata;
            }
        }
        return metadata;
    }

    private LifecycleMetadata buildLifecycleMetadata(final Class<?> clazz) {
        if (!AnnotationUtils.isCandidateClass(clazz, Arrays.asList(this.initAnnotationType, this.destroyAnnotationType))) {
            return this.emptyLifecycleMetadata;
        }

        List<LifecycleElement> initMethods = new ArrayList<>();
        List<LifecycleElement> destroyMethods = new ArrayList<>();
        Class<?> targetClass = clazz;

        do {
            final List<LifecycleElement> currInitMethods = new ArrayList<>();
            final List<LifecycleElement> currDestroyMethods = new ArrayList<>();

            ReflectionUtils.doWithLocalMethods(targetClass, method -> {
                if (this.initAnnotationType != null && method.isAnnotationPresent(this.initAnnotationType)) {
                    LifecycleElement element = new LifecycleElement(method);
                    currInitMethods.add(element);
                    if (logger.isTraceEnabled()) {
                        logger.trace("Found init method on class [" + clazz.getName() + "]: " + method);
                    }
                }
                if (this.destroyAnnotationType != null && method.isAnnotationPresent(this.destroyAnnotationType)) {
                    currDestroyMethods.add(new LifecycleElement(method));
                    if (logger.isTraceEnabled()) {
                        logger.trace("Found destroy method on class [" + clazz.getName() + "]: " + method);
                    }
                }
            });

            initMethods.addAll(0, currInitMethods);
            destroyMethods.addAll(currDestroyMethods);
            targetClass = targetClass.getSuperclass();
        }
        while (targetClass != null && targetClass != Object.class);

        return (initMethods.isEmpty() && destroyMethods.isEmpty() ? this.emptyLifecycleMetadata :
                new LifecycleMetadata(clazz, initMethods, destroyMethods));
    }
}
§ 4.3 invokeInitMethods()
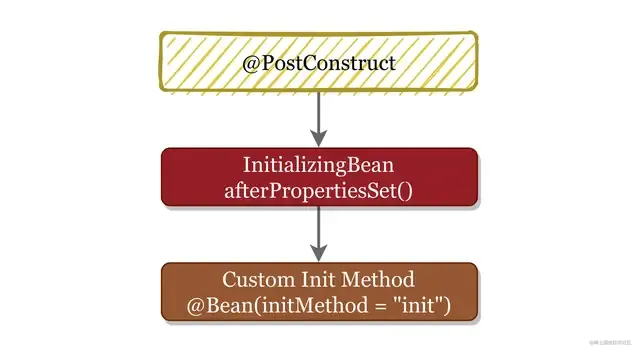
invokeInitMethods()方法同样简单得不得了,它先调用InitializingBean的 afterPropertiesSet() 方法,然后调用 Custom Init Method (就是 @Bean 注解中 initMethod 属性值所指定的方法)。
protected void invokeInitMethods(String beanName, Object bean, @Nullable RootBeanDefinition mbd) throws Throwable {
    boolean isInitializingBean = (bean instanceof InitializingBean);
    if (isInitializingBean && (mbd == null)) {
        ((InitializingBean) bean).afterPropertiesSet();
    }

    if (mbd != null && bean.getClass() != NullBean.class) {
        String[] initMethodNames = mbd.getInitMethodNames();
        if (initMethodNames != null) {
            for (String initMethodName : initMethodNames) {
                if (StringUtils.hasLength(initMethodName) &&
                        !(isInitializingBean && "afterPropertiesSet".equals(initMethodName))) {
                    invokeCustomInitMethod(beanName, bean, mbd, initMethodName);
                }
            }
        }
    }
}
结合 § 4.2 和 § 4.3 这两小节内容,我们可以得出一个重要结论:@PostConstruct 优先于 afterPropertiesSet() 方法执行,而 afterPropertiesSet() 又优先于 Custom Init Method 执行,如下图所示。
§ 4.4 applyBeanPostProcessorsAfterInitialization()
顾名思义,
applyBeanPostProcessorsAfterInitialization()方法用于遍历BeanPostProcessor,在遍历过程中调用其postProcessAfterInitialization()方法。
public abstract class AbstractAutowireCapableBeanFactory extends AbstractBeanFactory implements AutowireCapableBeanFactory {
    @Override
    public Object applyBeanPostProcessorsAfterInitialization(Object existingBean, String beanName)
            throws BeansException {

        Object result = existingBean;
        for (BeanPostProcessor processor : getBeanPostProcessors()) {
            Object current = processor.postProcessAfterInitialization(result, beanName);
            if (current == null) {
                return result;
            }
            result = current;
        }
        return result;
    }
}
BeanPostProcessor 最广为人知的一个应用场景是用来桥接 Spring AOP 与 Spring IoC 容器,在 Spring AOP 中扮演这一桥接角色的就是AbstractAutoProxyCreator,大家如果对 Spring AOP 实现原理感兴趣,可以从这个 BeanPostProcessor 实现类入手!
5 总结
尽管笔者写了这么多文字、贴了这么多代码、画了这么多图,但单单靠阅读一篇文章试图搞懂 Bean 加载流程是不太现实的,还是需要大家亲自去阅读源码,在阅读源码过程中,切记不要钻牛角尖,否则只会让大家读不下去,失去信心与勇气,这是笔者的亲身体验。