- A+
seata前身叫fescar,是阿里开源的实现分布式事务中间件。
官网地址:https://github.com/seata/seata
中文文档:https://github.com/seata/seata/wiki/Home_Chinese
原理就不说了,话不多说,直接分享代码:
首先需要安装seata服务,下载地址:
https://github.com/seata/seata/releases
里面都是linux、windows都同时可以用的绿色版安装包
1.启动seata服务
默认以file形式注册,直接可以启动,启动端口默认为8091
sh seata-server.sh -p 8091
加上-p参数可以修改seata启动端口
2.配置需要分布式事务项目的工程
a.加入maven依赖(我之前贴出来的忘记把spring-cloud-alibaba-seata的依赖贴出来了):
<seata.version>0.9.0</seata.version>
<!-- 分布式事务支持 -->
<dependency>
<groupId>com.alibaba.cloud</groupId>
<artifactId>spring-cloud-alibaba-seata</artifactId>
<version>2.1.0.RELEASE</version>
<exclusions>
<exclusion>
<artifactId>seata-all</artifactId>
<groupId>io.seata</groupId>
</exclusion>
</exclusions>
</dependency>
<dependency>
<groupId>io.seata</groupId>
<artifactId>seata-all</artifactId>
<version>${seata.version}</version>
</dependency>
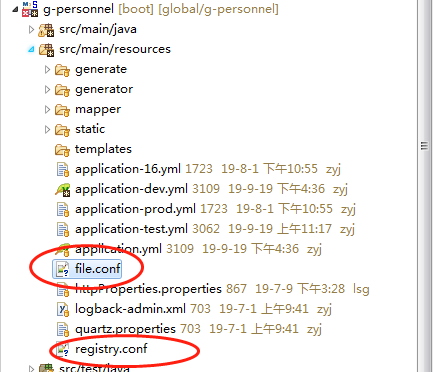
b.将file.conf和registry.conf复制到需要开启分布式的spring boot工程配置目录下
如果以file形式注册,默认配置不用改
但是file.conf有一处要根据服务名来修改
vgroup_mapping.xxxx-fescar-service-group = "default"
xxxx表示你的spring.application.name

c.在每个业务数据库中创建undo_log表,记住每个需要使用分布式事务的库都要创建,这张表是seata记录事务和回滚事务用的,必须创建,表名可以修改,file.conf中有配置,创建表脚本:
CREATE TABLE `undo_log` ( `id` bigint(20) NOT NULL AUTO_INCREMENT, `branch_id` bigint(20) NOT NULL, `xid` varchar(100) NOT NULL, `context` varchar(128) NOT NULL, `rollback_info` longblob NOT NULL, `log_status` int(11) NOT NULL, `log_created` datetime NOT NULL, `log_modified` datetime NOT NULL, `ext` varchar(100) DEFAULT NULL, PRIMARY KEY (`id`), UNIQUE KEY `ux_undo_log` (`xid`,`branch_id`)) ENGINE=InnoDB AUTO_INCREMENT=1 DEFAULT CHARSET=utf8;
d.配置代理数据源,需要将业务数据源放到代理数据源中,另外mybatis的SqlSessionFactory需要手动配置,将代理数据源写入mybatis的SqlSessionFactory中,代码如下:
package com.mcu.config;import javax.sql.DataSource;import org.apache.ibatis.session.SqlSessionFactory;import org.mybatis.spring.SqlSessionFactoryBean;import org.mybatis.spring.transaction.SpringManagedTransactionFactory;import org.springframework.beans.factory.annotation.Value;import org.springframework.boot.context.properties.ConfigurationProperties;import org.springframework.context.annotation.Bean;import org.springframework.context.annotation.Configuration;import org.springframework.context.annotation.Primary;import org.springframework.core.io.support.PathMatchingResourcePatternResolver;import com.alibaba.druid.pool.DruidDataSource;import io.seata.rm.datasource.DataSourceProxy;import io.seata.spring.annotation.GlobalTransactionScanner;@Configurationpublic class DBConfig { @Value("${spring.application.name}") private String applicationId; // mybatis配置 @Value("${mybatis.mapper-locations}") private String mapperLocations; @Value("${mybatis.type-aliases-package}") private String typeAliasesPackage; @Value("${mybatis.configuration.map-underscore-to-camel-case}") private boolean mapUnderscoreToCamelCase; @Bean @ConfigurationProperties(prefix = "spring.datasource.druid") public DataSource druidDataSource() { DruidDataSource druidDataSource = new DruidDataSource(); return druidDataSource; } @Primary//@Primary标识必须配置在代码数据源上,否则本地事务失效 @Bean("dataSourceProxy") public DataSourceProxy dataSourceProxy(DataSource druidDataSource) { return new DataSourceProxy(druidDataSource); } @Bean public SqlSessionFactory sqlSessionFactory(DataSourceProxy dataSourceProxy) throws Exception { SqlSessionFactoryBean factoryBean = new SqlSessionFactoryBean(); factoryBean.setDataSource(dataSourceProxy); factoryBean.setTypeAliasesPackage(typeAliasesPackage); factoryBean.setMapperLocations(new PathMatchingResourcePatternResolver() .getResources(mapperLocations)); factoryBean.setTransactionFactory(new SpringManagedTransactionFactory()); factoryBean.getObject().getConfiguration().setMapUnderscoreToCamelCase(mapUnderscoreToCamelCase); return factoryBean.getObject(); } /** * 初始化分布式全局事务扫描 * * @return */ @Bean public GlobalTransactionScanner globalTransactionScanner() { return new GlobalTransactionScanner(applicationId.toLowerCase(), applicationId.toLowerCase() + "-fescar-service-group"); } }
以上代码可参考官方示例:
https://github.com/seata/seata-samples/tree/master/springboot-mybatis
mybatis配置,数据库的就不贴了,druid配置都差不多
mybatis: mapper-locations: classpath:mapper/*.xml #注意:一定要对应mapper映射xml文件的所在路径 type-aliases-package: com.jiachi.gcommon.entity.personnel # 注意:对应实体类的路径 configuration: mapUnderscoreToCamelCase: true
d.配置feign调用拦截器传递分布式事务xid:
import org.apache.commons.lang.StringUtils;import org.springframework.context.annotation.Configuration;import feign.RequestInterceptor;import feign.RequestTemplate;import io.seata.core.context.RootContext;//内部调用需要token校验,这边将页面端的token和平台属性转发给feign@Configurationpublic class FeignConfig2 implements RequestInterceptor { @Override public void apply(RequestTemplate requestTemplate) { String xid = RootContext.getXID(); if (StringUtils.isNotBlank(xid)) { System.out.println("feign 获得分布式事务xid:"+xid); } requestTemplate.header("fescar-XID", xid); }}
e.启动类禁用数据源自动配置类
@SpringBootApplication(exclude= {DataSourceAutoConfiguration.class})//禁用默认的自动配置数据源类
3.调用分布式事务
调用分布式事务的service或controller的方法加上@GlobalTransactional注解就可以使用seata管理分布式事务了
但是注意:目前默认的分布式事务隔离级别为读未提交读,在回滚前是可以用其他工具查询到数据的,比如你的分布式事务执行到一半时,是可以用navicat工具查询到数据的,如果中间出了异常,会正常的回滚
还有一些遗留问题如下:
1.目前我还没遇到这个bug,不知道是不是我的场景测试不够,bug如下:
https://github.com/seata/seata/issues/883
2.目前seata不支持复合主键的表,会报错:
io.seata.common.exception.NotSupportYetException: Multi PK
所以需要将表改成单个主键,这要是遇到有表分区,直接就不能用了。。唉


